Sunday, 4 August 2019

Undead: Soul Reavers

I had a day off during the week whilst I waited for the Mythic Battles: Pantheon boxes to arrive so I took the chance to try out the monochrome paint job on the Soulreaver Cavalry which I'd built over the weekend.


Starting off with a light grey undercoat I then dry brushed a gloss white over the top to create a pre-highlight for the paint to go over. Next I then went over that with a dark grey mixed with flow aid to make it pool more in the recesses, this also had the effect of sliding off the gloss white. Wanting to add to the contrast the next stage was a black wash and then it was finished off with two more dry brushing layers, the first of my dark grey with a dab of light grey mixed in and then a very light pass with off-white.


Whilst this is more steps than I usually use when painting it all went together very quickly and I didn't need to worry about being careful to stay within any lines. I could have gone darker but as the knights are going to be mounted on a mostly black base I wanted them to stand out from the background.


As well as six knights each box contains two dogs, I plan to use one each per regiment of knights and then that gives me four to make into another unit of some sort.
Overall I'm very pleased with the way these turned out and I'm looking forward to seeing how they look once on the multi-base.


As I was still waiting for some paint to arrive for the Deadzone models I also had a look at the models for the Soulreaver Infantry. Fireforge do a nice range of plastic weapons so I bought a mixture of halberds and got some extra resin shields as part of the Kickstarter.


Once again the kits are excellent with lots of choices, as I was using the halberds I cut away the existing weapons and then drilled holes to stick the new weapon into.


The are going to be painted in the same mono-chrome scheme as the knights so in theory should also be pretty quick to get painted up.


I also managed to get some Deadzone in this week meeting John down the Old Duke yesterday. Somehow I didn't get any pictures but we had four good games which mostly ended up very close apart from one heavy loss to me. I'm really starting to love the mechanics for the game as it promotes a positive style of combat and with the exploding 8's can conjure some against-the-odds heroics. So I really need to get cracking on painting up my models.


Sunday, 28 July 2019

Ridin' into the Deadzone

After a successful raid into Devizes last week I came away with enough troops to put together a wide variety of lists for my new Deadzone Marauders.
Deadzone is a sci-fi skirmish played on a 3 foot square board with terrain and line of sight being key, Mantic sell plastic terrain which can be used to create a fully 3D board, being higher than your opponent is a real advantage and towers can be climbed and fall damage is part of the rules.


Mantic offers starter box's for all the factions and for under £50 you can get both the starter and booster box which gives you more than enough options to get going. I've been looking at Deadzone for a while and the Marauders specifically mainly because of how much I liked the look of the models. They are Orcs (not Orks) and act as professional mercenaries for the various factions with the universe.
The models that first drew me in where the Marauders in exo-suits which come in two flavors. The Rainmaker is reckoned to be one of the most destructive ranged units in the game, with a weapon for every occasion and the Mauler packs a punch when things get messy up close.


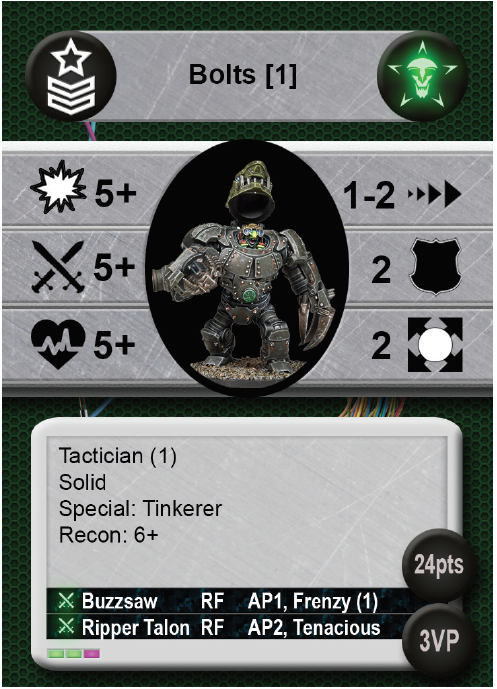
Deadzone works on a D8 system so each unit has a ranged, melee and save stat (on the left of the card) and then a move (walk/sprint), armour and size (on the right of the card) stat as well. No rulers are used in Deadzone as the map is divided into squares and all moves and ranges measured by those squares.
I've picked a good time to get started in Deadzone as a new update book has just been released which included some new units and the models for those had just been released as well.
Continuing in the exo-suit theme is the Bolts / Gruntbot model, this model comes with a separate helmet that can be modeled raised or shut. Each Deadzone Strike Team must have a leader and Bolts is a Goblin with a big suit and a penchant for up close violence. I will go over the Strike team composition rules another time but a standard force is 200 points.


You can also use the same model as a Gruntbot which has the same base stats as Bolts but comes with a wide array of different weapon choices depending on what sort of enemy you think you will be up against. I'm going to attach some magnets to the claw arm on these models so I can then swap the weapons about to arm them appropriately.

R is the range is Squares. RF is Melee Only
AP is the Amount of Armour the Weapon Ignores

After constructing all the Marauders during the week I also put together one of the Undead Knights boxes from Fireforge Games. After a week spent sweltering over the Marauders with my superglue gel running like water it was a much more relaxing Sunday morning doing these.


The models went together really well and the two dogs you get are a real bonus as was the amount of options for weapons you get in the box. You also get 12 heads for 6 models so I will be able to do some head swaps with the spares.


All in all I'm happy with the quality of the miniatures which is well up to the normal Fireforge standard. But I want to get the Marauders done first as I hope to have a play around with some of the new Contrast paints from GW, especially to see how they perform over a metallic base.


On a side note I've also received the delivery notification for my Mythic Battles: Pantheon v1.5 which should be arriving next week, it never rains but it pours.........

Saturday, 20 July 2019

Undead: Death on a Pale Horse

In an exciting end to the week I picked up my Undead from the Fireforge Kickstarter campaign today from the post office. I'd been tracking there progress for a couple of weeks as they made the seemingly long journey from Holland to the UK.


The boxes look spiffing and I paid out for 3 of Knights, 2 of Warriors and 1 of Peasants. The Knights and Warriors are going to be used in the Undead army as Soul Reavers and will form the contingent lead by Death.

Each Horse Sprue also has an Undead Dog

The model sets come with plenty of options and I can see I will be able to add some undead heads onto the couple of normal humans I received to make them into undead without too much work.


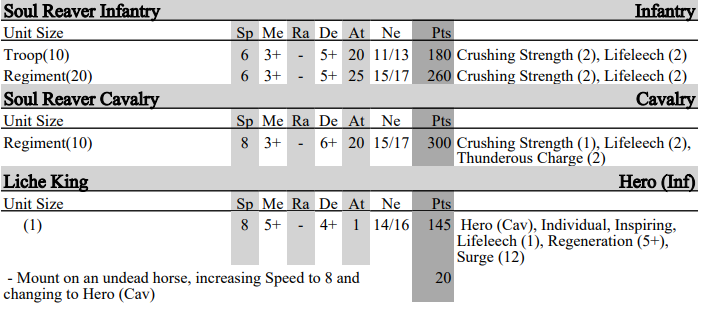
The Soul Reavers are the toughest and most expensive units available to the Undead (well in v2, v3 could change that) with the cavalry in particular being very nasty. It will be interesting to see if they retain Defence 6+ or not. These should still provide a heavy hitting hammer that can also take a fair bit of beating before they are routed.
The scheme I currently have planned for this section is a mono-chrome world with not only the Soul Reavers painted in a ghostly scheme but also all the terrain as well. It's not something I have ever attempted before so it should be interesting to try and do.


The Peasants will be helping to form another contingent but that is for another post, again they come with lots of options.


I also got some painting done this week and worked on some models I had left over for SAGA / Vanguard. So I got a couple of mystic types done for either SAGA priests or Vanguard objectives and a Saxon banner bearer who I bought as he looked interesting.


This weekend is also Attack weekend in Devizes which we will be visiting tomorrow so no doubt I will be able to add some more figures onto the pile, huzzah!

Sunday, 14 July 2019

A Tale of Two Forts: Burn the Stores

The next game in the ongoing Tale of Two Forts was the Burn the Stores scenario for Vanguard. This scenario saw the Argent Defenders on the attack trying to burn down a storehouse being defended by the Melas Oneiros. Unusually for the scenarios we have played so far there was only a hook for the winners in the next KoW game so the Nightstalkers only fought to stave off disaster not for any advantage.


The Melas Oneiros fielded an unchanged warband composition with the only change being swapping out a fresh Phantom for the one who's speed had been reduced to 4" after being wounded in the last battle. The Argent Defenders once again shuffled the deck and fielded a power dice intensive list.

1 * Veteran Sergeant
1 * War Wizard
1 * Ogre Guard
2 * Veteran Sister
2 * Sergeant
2 * Paladin Defender
3 * Men-at-Arms

This left them with eight red dice and two white, which is a whole heap of dice to be throwing each round.


The scenario required the Melas Oneiros to defend a barn from being set on fire which was done by being in contact with the barn and spending a long action to set a fire. The defenders could remove a fire marker by again spending a long action whilst in contact with the barn.


My plan was very simple which was to force fatigue as many models from the group that need to move over to the barn to take an extra move and then try to stop the Basileans from getting into contact with the barn. The early moves saw my troops hot foot it over to the barn and even manage to pick a couple of the enemy off. With the number of power dice being rolled by the opposition I had to get lucky as Iron Resolve (giving a 3+ save) was being used pretty freely.


With the Argent Defenders not wishing to over commit by leaving themselves in charge range of my troops their right wing ground to a halt and the left spent a turn dealing with a Shadowhound.


At this point the game was effectively won by the Melas Oneiros, the Argent Defenders had no way of getting to the barn without exposing themselves to a charge and the Melas Oneiros had no need to over-extend themselves.


The Ogre did manage to kill another Phantom and the War Wizard had a few long range pot-shots but nothing major happened in the last couple of turns.


I think had this been a one off game then the Basileans would have been more inclined to charge in but having a developing Warband and the chance (though very slim) of having a model permanently lost meant they did not want to commit.


So the first actual win (after a few moral ones) of the Vanguard part of the campaign with the next battle being a Kings of War battle using the Pillage scenario.

Sunday, 7 July 2019

Undead: The Four Horsemen

I had started planning out and next (and possibly final) Kings of War army. With a load of Undead on the way from Fireforge and having swapped out my long awaited Mierce Werewolves for more Wraiths and Skeletons it was really only a case of getting a theme and building an army list around that.
I had settled on a list when Mantic announced the impending release of KoW v3, this came the day after I'd placed the order for the extra models required so I'm hoping that nothing much changed in the relative usefulness and availability of the units I have planned out.
I had decided upon the theme of the Four Horsemen of the Apocalypse with each Horseman leading a different section of the army and each section depicting the same land but under the effects of the different Horseman. This should give me plenty of scope to create some interesting basing schemes but will involve some effort to make the whole army appear cohesive. For the description of the Horsemen I settled on one that  tallied with my recollections of reading Good Omens many moons ago:

Death on his pale horse,
Famine with his scales,
War carrying a sword,
and Pestilence with his crown.

The last Horseman is often depicted with a Bow and is also called Conqueror and Plague but Good Omens picks out the Crown as it's special feature.

Albrecht Dürer Woodcut

Having planned out a list which of course now is quit probably subject to some revision I then divided up the list into 4 sections for each Horseman.
The first section is that lead by War, who will be being played by one of the Fireforge models. I'm not yet sure if it will be one of the knights from the box-set or perhaps a modified Aylard with a head-swap, much will depend upon how the models are put together. Venkhalt would be an obvious choice to use but with his crown he would seem to fit in better elsewhere.


The rest of War's entourage will consist of


The Revenant Cavalry and Lykanis will be Mantic models and the scene will be set with a suitably war-like covering of dead mean and beasts and plenty of blood.
Revenant Cavalry are excellent chaff which can hit hard but also have the advantage of being fearless which means you can never get stuck behind them due to wavering. They are also Shambling which means they can be surged but cannot move at the double. I also like having a fast, nimble, tough unit that can pick up and carry tokens, so the Lykanis is a perfect fit for that role, I just hope that the scenarios in v3 still have a need for that kind of unit.

Sunday, 30 June 2019

Even Pirates go to Church

When I picked up the buildings from Games of War I bought some extra roof sections with the intent of building a church, that  plan has finally come to fruition.


The church itself is foam board covered with a paint & Polyfilla mix with the windows and doors supplied by Firedragon Games. The fittings come with a flat back so are perfect for sticking onto the outside of a building.


As buildings can be occupied in Blood & Plunder the roof comes off with space inside to fit a reasonable number of troops.


Alongside the church I also completed the extra Spanish troops for the Militia army. The twelve musket armed troops could be used to bulk out the units I already have or could be used as Soldados.


The Soldados come with lots of options to pimp out the unit so they could add an elite unit to the Spanish army, being a support unit means you may have to miss out on another elite unit like the Indios however.


The Warlord ECW box came with enough parts to make an officer and musician for both sides, these can be added as characters to a force.


The English got a drum to beat, perhaps Drakes famous drum ? Whilst the Spanish got a piper.


The musician is cheap at only 2 points whilst there are a couple of different officer options with the full blown Officer acting as a backup in case the force leader dies.


Lastly, just before I sat down to write this my copy of the latest novel to come out of Mantica arrived so that should take care of the bedtime read for a while. This story is about the Basileans and looks to explore the workings of the totalitarian religious state.


Sunday, 23 June 2019

A Tale of Two Forts: Control

The third of our big battles for the campaign saw us play out the Control scenario. This involves dividing the table up into two foot squares with points awarded per square to the side with the most unit strength in the square. This battle also saw the involvement of a new general, young Sam who I persuaded to help me out on the Herd side.


The Salamanders opted for a heavy left flank whilst attempting to refuse the right and centre whilst the Herd hoped to turn the Salamander right and break the centre whilst holding off the right.


The opening moves saw the Herd push forwards on their left and centre whilst the Salamanders held back with the positions being reversed on the Herd right flank. The Salamander shooting proved failed to cause many casualties on the Herd side.


One thing I have noticed is that the Salamander shooting hasn't been as decisive as I had initially feared, they never seem to have reached enough weight of fire in a sector to take units off the table.


The opening combats saw the Herd take off a couple of units on the Salamander right and threaten to turn the flank.


On the other flank the Herd played for time and managed to bottle the Salamander heavy hitters up behind their chaff.


In the centre the Herd continued to advance and set themselves up for charges whilst the Salamanders held firm.


On the Herd right they managed to get a couple of charges in that if successful would have spelt disaster for the Salamanders but unfortunately they failed to rout both the units they charged.


The centre saw the Herd counter charge and destroy two units having survived the charge they had to take due to the hills.


On the left the Giant Eagles had fallen to a double six nerve roll (must get some fast flying Inspiring for the flying flank) but the Brutox and Chimera had made up for the loss with some excellent melee work.


Now at this point I needed to get cracking on lunch so I didn't get any more picture so I hope that Stu over at Cirencester Wargames got some.
The last two turns saw the Herd wiped out on their right flank but the had held up enough that the Salamanders could only reach one of the centre squares (worth 2 VP's) which cancelled out the one held by the Herd after they destroyed the Salamander Prime Herd. However the Salamanders held two other squares to one held by the Herd so they ran out 4-3 victors, all in all a very close game that could have gone either way at the end.
One point of note is that the allied Regiments finally made an impact with the Basileans Finnish off the Spirit Walker Horde and the Nightstalkers managing to get into combat with a powerful unit (at last!) and routing them.

That means the overall campaign situation is 2 - 1 for the Herd, so the Salamanders need to win again in order to stop the Herd taking an unassailable 3 - 1 game lead.