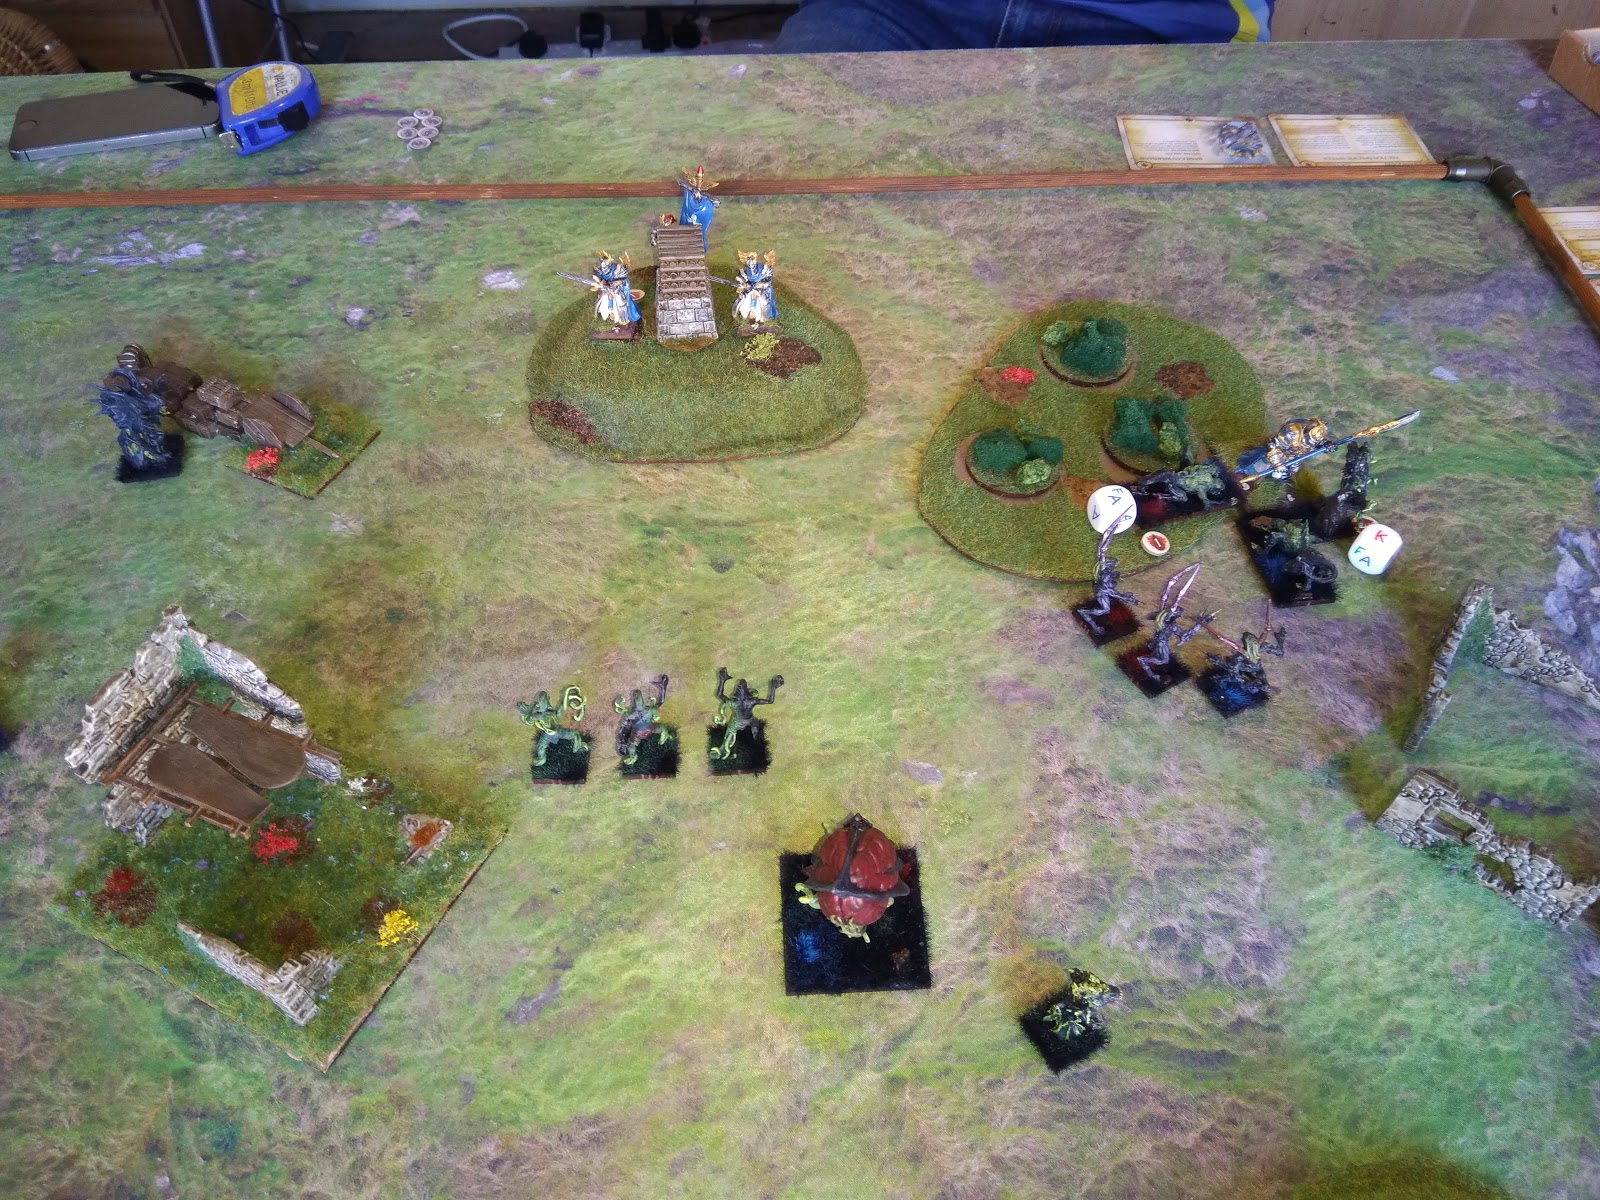
The second battle of the Tale of Two Forts campaign was a full size KoW battle at the 3000 points mark. In order to accommodate the extra forces I broke out the 2 foot extension so we played across a frontage of 8 feet. As I had won the previous encounter in the campaign I was able to field an additional infantry unit up to the value of 10% of the army, as the Spirit Walker Horde is the most expensive infantry unit the Herd have at 230 points I went with that.
The Salamander viewpoint is documented over on the Cirencester Wargames blog.
My force was pretty much all the Herd units I own with the inclusion of a Guardian Champion who was included to carry the tokens used in the scenario. With nimble, a decent nerve and good defence I thought he would be a good carrier unit.
The Salamanders started in a clump formation with a few units on their extreme right slightly isolated by the impassable Ganesh statue. They also put on their tokens on one unit which was the Basilean allied Regiment representing the Vanguard force helping out in the big battle. They spent the whole battle giving moral support from the rear lines. In contrast my Nightstalker allied unit was free of such responsibilities and was able to join the main battle line.
The early moves saw the Salamanders hang back as they had the superiority in shooting and my Herd move cautiously forwards making sure I did not overcommit early on. Fortunately the Salamander shooting was spread across the whole front so they could not bring overwhelming firepower to bear on any one unit, this meant that my Shamans could cover most of the damage as it came in, some poor shooting dice from the Salamanders also helped.
It was also at this point that they made a mistake by pushing forwards just enough to move the Basileans up so their flank rested on the Ganesh statue. This meant that when the Salamanders realised they may not be able to push through the middle and carry their tokens across the halfway mark they also did not have enough time to swing out onto the flank and cross the over that way.
With the Salamanders hanging back I was also able to move forwards and seize the fourth token with my Guardian Champion and at this point I made what could have been a costly mistake. Not realising that I still scored 1 victory point per token in my half I pushed him forwards and he started to take fire from the Salamanders.
On the Herd right flank I had been edging forwards and around the refused flank and at the same time as committing in the centre I pushed forwards on the right to try and stop anything from moving over to the centre fight. This was reasonably successful though neither side managed to do much in the way of killing on that flank.
On my left flank the Chariot Horde had managed to lay down some effective fire and the other Salamander heavy cavalry Regiment was kept at arm's length the entire battle. In fact neither of the enemies big hitters were able to really get involved in the game.
The biggest disappointment for me was the Doppelgangers who managed to get tied up in a grind with an archer troop, they natively have a rubbish melee stats and could not steal a better one from the archers.
In the end the Salamanders conceded defeat as it was obvious that they would not be able to carry their tokens across the table and also could not kill my token carrier who had moved out of range, so a 4-3 victory for the Herd.
Next time out we will be playing Vanguard and the Melas Oneiros will be seeking to recapture some plans which have gone astray with the Argent Defenders trying to steal the plans for themselves.
Sunday, 10 March 2019
Sunday, 3 March 2019
Herd Complete
Really, that's it this time I really have completed all the Herd units I'm doing for the army, well probably.
So having had a week off I managed to crack on and finish off a fair bit of work. The biggest bit of work was completing the second lot of Boartaurs for the Herd army. With the ones I'd already done I now have enough for two Regiments of Longmanes if I fill them out with a few wolf models.
Whilst I was lacking enough of the previous GW heads I'd used I did have the Orc heads which came with the Gore Riders and these of course have the advantage of being designed to fit the bodies so slotted in rather well. For the spears I used up some more bits from the GW Beastmen starter set and I also added some pauldrons on from the same set to help balance out the look.
I also added one model with a bow to use as a Centaur Chief as I've used that unit a few times in my games against Mick and he really ticks a lot of boxes as a general utility unit.
I've also added a beach themed battle mat to my collection and once I have the jungle scatter terrain finished it should be ready to show off fully.
The early turns saw both sides advancing and taking a token each and the fighting was fairly limited. The Herd managed to make off with one token on a Beast Pack and Gnaeus made off with one for the Basileans.
The Herd then took another with a unit of Lycans whilst trying to pin Gnaeus with a Brutox. The Brutox however was shot away and Gnaeus managed to beat a retreat with the token.
The middle part of the battle saw the remarkable survival of the Basilean Spear Horde who despite having over 30 wounds survived a triple charge thanks to me rolling snake-eyes.
The rest of the battle saw the Herd grind through the Basilean forces but on the last turn the scores where still tied and Mick had a chance to win as I'd move my Beast Pack to far into the backfield and he was able to get the Phoenix into position for two lots of breath attack. Fortunately for me he was not able to rout me on the resulting nerve tests.
His Priest also managed a successful charge on my Giant Eagles which meant they could not fly and seize a token on the last turn and sneak a victory for the Herd.
In the end it was a really close game with some good and bad rolling on both sides and the result was in the balance right up to the last combat.
So having had a week off I managed to crack on and finish off a fair bit of work. The biggest bit of work was completing the second lot of Boartaurs for the Herd army. With the ones I'd already done I now have enough for two Regiments of Longmanes if I fill them out with a few wolf models.
Whilst I was lacking enough of the previous GW heads I'd used I did have the Orc heads which came with the Gore Riders and these of course have the advantage of being designed to fit the bodies so slotted in rather well. For the spears I used up some more bits from the GW Beastmen starter set and I also added some pauldrons on from the same set to help balance out the look.
I also added one model with a bow to use as a Centaur Chief as I've used that unit a few times in my games against Mick and he really ticks a lot of boxes as a general utility unit.
The Longmanes come in Troops or Regiments and add a cheap hammer to the army list, whilst they may not be as powerful as other hammers in the list they are the cheapest .
You can also field a legendary unit of Flaxhoof's Chosen who are a nice upgrade on the regular Longmanes with Regen(5+) which would improve the chances of them hanging around. Both units have CS(1) which is unusual for cavalry hammers and again would help in a grinding fight.
The Centaur Chief is a great utility unit especially when armed with a bow, whilst he only has 4 attacks he generally gets some wounds on a target and his melee capabilities are not to be underestimated.
I also added some 3D printed terrain to my growing maritime collection, these are from Iron Gate and for the price the quality was OK. You could tell from the layers that these are 3D printed but this is really only noticeable when you are close up.
I've also added a beach themed battle mat to my collection and once I have the jungle scatter terrain finished it should be ready to show off fully.
Mick and I also had a good game of KoW this week with my Herd once again facing off against his Basileans. Mick changed his list up and went with a bit more shooting and some smaller Regiment units rather than Hordes whilst I went with the same list as our last battle.
I won't go through the whole battle but we played the Plunder scenario which sees both sides try to seize and hold loot tokens placed along the centre of the table, side which holds the most at the games end wins.
The early turns saw both sides advancing and taking a token each and the fighting was fairly limited. The Herd managed to make off with one token on a Beast Pack and Gnaeus made off with one for the Basileans.
The Herd then took another with a unit of Lycans whilst trying to pin Gnaeus with a Brutox. The Brutox however was shot away and Gnaeus managed to beat a retreat with the token.
The middle part of the battle saw the remarkable survival of the Basilean Spear Horde who despite having over 30 wounds survived a triple charge thanks to me rolling snake-eyes.
The rest of the battle saw the Herd grind through the Basilean forces but on the last turn the scores where still tied and Mick had a chance to win as I'd move my Beast Pack to far into the backfield and he was able to get the Phoenix into position for two lots of breath attack. Fortunately for me he was not able to rout me on the resulting nerve tests.
His Priest also managed a successful charge on my Giant Eagles which meant they could not fly and seize a token on the last turn and sneak a victory for the Herd.
In the end it was a really close game with some good and bad rolling on both sides and the result was in the balance right up to the last combat.
Sunday, 24 February 2019
Building Up
With no game night this week as we went for curry instead I don't have a huge amount to post about apart from some bits of terrain I completed.
The main parts are the extra buildings I hadn't built from the Warlord games box set which I completed in the same style as the first ones. Again I added an extra floor to one piece using the rafter section that came in the set. I also got some Spellcrow ladders to reach up to the raised sections and some barrels from Ainsty Castings. The barrels come in a good variety of sizes and can be used to create some interesting looking barriers and obstacles.
Also from Ainsty Castings I got a couple of timber stacks a a wooden jetty set to build up some waterfront scenery options. All the wooden parts got a quick coating of cheap acrylic brown and then some Army Painter dip and a little dry brushing.
For only £8.50 you get a good length of jetty which comes in small sections so gives lots of chance for variety when being set out.
Well that's it for this week on the completed front, no doubt I will have more next week and we should be back on the Kings of War battles as well, Mick has been tweaking his 2000 point list so it will be interesting to see what he comes up with.
Sunday, 17 February 2019
Ganesha Arrives
This week saw the arrival of some terrain that my Herd Brutox could really appreciate. I wanted to add something to the table that reflected at least one unit in the army and this Ganesh fish tank ornament really fits the bill. Costing only £10 including postage it's a bit of a bargain and I had intended to do some further work on it once it arrived but in truth it looked good enough without any action on my part.
They do a few more ornaments that might well fit well on the table so now I've seen the quality I may look to add a couple more.
We also played another Kings of War game this week with Mick keeping the same force as last time and I switched my army up to use some more of the units I've painted.
This time I went with :
2 * Horde Guardian Brutes one with Brew of Haste
1 * Horde Lycans
3 * Troop Beast Pack
1 * Horde Giant Eagles
1 * Stampede
1 * Brutox
1 * Centaur Chief with Bow & Slashing Blade
2 * Shaman with Mount & Heal(5)
We played the Dominate scenario which totals up the unit strength of each army for any unit mostly within 12" of the centre point after 6 turns. I opted for a more spread out deployment with the Mick going for a more compact setup.
I won't go through a turn by turn account but the game itself played out with the Herd generally advancing and the Basileans happy to hold back and try and make a forward movement at the death. On the Herd right flank a little battle within the battle was played out as a unit of Paladin Knights tried to out-maneuver a Beast Pack and the Centaur chief, in the end it could not shake free and spent the game out on that flank.
The Brutox seemed to be very happy with the new statute on the table and really outperformed my expectations and I was surprised he was still hanging around by the end of the game.
On the left and in the centre I managed to remove enough of the Basilean scoring units to make the victory clear cut with the only real loss being the Horde of Giant Eagles.
I was pretty happy with this army setup with the army as a whole being a little more maneuverable due to the loss of the two largest units and them being replaced with two units with Strider, it did mean however that my shooting was reduced to just the 4 dice on the Centaur.
Sunday, 10 February 2019
KoW: Push
This week we pushed up the KoW armies to 2000 points and played the Push scenario, this involves moving 3 tokens into the opposite half of the table, a bonus token is placed in the centre of the board to be claimed. You get 2 points per token you hold with the unit entirely in the opposite half and 1 point per token with the carrying unit at least partially in your half.
Interestingly a unit can carry as many tokens as you like but the move of the carrying unit is reduced to 5.
The armies comprised of :
Herd
1 * Horde Spirit Walkers with Brew of Courage
2 * Horde Guardian Brutes with Elite & Pipes of Terror
1 * Horde Lycans
3 * Troop Beast Pack
1 * Horde Giant Eagles
1 * Horde Tribal Chariots
1 * Centaur Chief with Bow
2 * Shaman with Mount & Heal(5)
Basilean
1 * Horde Men-at-Arms(Spear)
2 * Regiment Men-at-Arms(Sword)
1 * Horde Elohi
2 * Regiment Paladin Knights with Brew of Haste
2 * Troop Panther Laners
1 * Gnaeus Sallustis
1 * Priest with Bane-chant
1 * War-Wizard
1 * Phoenix
1 * Holy Lancers formation
1 * Shield of the Golden Horn formation
The Herd concentrated the tokens on the Spirit Walker Horde which was positioned on their right flank with a pretty clear run across the table. The Basileans gave two tokens to the Spear Horde and one to the Sword Regiment to their left.
The opening moves saw the Herd advance forwards with the Chariots and Centaur Chief laying down some fire. This did little damage but did waver a Troop of Panther Lancers. The Basileans had plenty of heals with the Phoenix on the table and Iron Resolve helps with regaining the odd point of damage suffered.
The Basileans stood their ground with only the Knights on their left flank giving a little ground to stay out of the superior charge range of the Lycans and Herd Chariots.
The Herd then pressed forwards to claim the extra objective in the centre and also continued to press forwards on the right. The Horde of Eagles far out on the left flank kept back out of engagement range.
The Basileans again largely held their ground with a Panther Lancer Troop charging home in the centre and some fire from the Phoenix and Wizard being most of the activity undertaken.
The Herd then managed to get a flank charge on the Phoenix but did little damage and a front charge on the Paladin Knights with the Lycans, which again failed to rout them. The Guardian Brutes did manage to rout the Panther Lancers however.
This seemed to spur the Basileans into action and the Elohi and the second Regiment of Knights joined the fight. Neither managed to rout their opponents and the Knight / Lycan fight settled down into a slugging match.
During this time the Spirit Walkers had edged over the half way line so the Herd had 7 Victory Points going into the last couple of turns.
The next turn saw a series of counter-charges on the main melees with neither side able to rout the other. I did manage a couple of double 1's rolls on nerve tests but not on tests that required anything other than double 1's to rout the enemy.
At this point the Centaur Chief had charged the Swordsmen Regiment and managed to hold it up in the opposite half of the table. And the Elohi and Guardian Brutes where positioned just inside the Basilean half.
The Basileans Spearmen had carried two tokens over the halfway line and with the final turn of the game the Elohi managed to rout the Guardian Brutes, take the token but then the follow-up move left them just short of being over the line. The Swordsmen could have won the game with a decent combat and follow-up move but could not rout the Centaur Chief.
So it ended 6 points a piece and a very close draw. Unusually for a KoW game both sides still had plenty of units left after six turns with some poor rolling on both sides especially for nerve tests to blame.
Sunday, 3 February 2019
A Tale of Two Forts: Light the Beacon
The first battle of the campaign saw the sides clash over a signal beacon in Salamander territory. The Melas Oneiros sought to set the blaze to call up reinforcements whilst the Argent Defenders tried to keep the fire out and allow the Salamanders time to act. This scenario gave the defenders 220 points to use and the attackers the full 250 points.
The Melas Oneiros fielded a strong force consisting of:
1 * Shade with Heavy Weapon - Company Commander
1 * Mind-screech with Bandages
2 * Shadowhounds
3 * Spectre - including the Quartermaster
3 * Reaper
2 * Shadow
1 * Horror
The Argent Defenders fielded a force they hoped could weather the attack consisting of:
1 * Veteran Sergeant
1 * Ogre Palace Guard
1 * War Wizard - Salamander Advisor
2 * Sergeants
2 * Paladin Defender
3 * Men at Arms with Spear
The first turn saw a general advance with the Argent Defenders moving in towards the centre to cover the path to the hill and the Melas Oneiros staying out of charge range of the Basileans but within range for the Shade and Shadowhounds to charge. At the start of the second turn the Argent Defenders made a mistake and moved the Ogre into rough ground to stop it being triple charged but this then left the War Wizard exposed. The plucky Salamander fell under the combined assault and was swiftly removed. In the centre the left hand Basileans had left cover and soon two Men-at-Arms fell to Spectre fire. Not a great start for the Argent Defenders.
It should be noted at this point that the dice gods smiled kindly on the Melas Oneiros for most of the game whilst the Argent Defenders had obviously offended them. At one point a 3D8 attack resulted in 7 hits (if I recall correctly).
In the next turn the Palace Ogre charged out into the Shade and managed to down the Melas Oneiros leader but could not finish it off. Things got even worse for the Argent Defenders when the Reapers charged into the rear of the Sergeant and Man-at-Arms next to the Ogre killing them both. On the Melas Oneiros left the last Sergeant charged and downed a Phantom but again could not kill it off. The Phantom then stood up and killed him with one mighty blow.
Somehow I managed to not take a picture of the final turn but the Ogre was overwhelmed and killed and the Melas Oneiros moved up to start bombarding the remaining Basileans with ranged fire. At this point we remembered the rules about warband breakpoints and the remaining Argent Defenders beat a retreat leaving the field to the Melas Oneiros.
The good rolling on the Nightstalker side made the victory quicker and less bloody that it should have been but I think allowing them to concentrate their best melee troops against only a fraction of the Basilean army was the key. Taking out the War Wizard so early who offered the Basileans their only shooting option and the ever useful heal was also a bonus.
In the after action phase I came away with 24 Campaign Gold and managed to promote a Shadowhound to Rank 1. Probably the biggest bonus was not loosing any troops so I don't need to spend gold on replacements.
Each Vanguard scenario comes with a hook into the next KoW game so for winning the Herd get to field a free Infantry unit worth upto 10% of the size of the army deployed. In theory this would be a 300 point unit but as the most expensive Herd Infantry unit is 230 points the advantage isn't as big as it could have been.
The Melas Oneiros fielded a strong force consisting of:
1 * Shade with Heavy Weapon - Company Commander
1 * Mind-screech with Bandages
2 * Shadowhounds
3 * Spectre - including the Quartermaster
3 * Reaper
2 * Shadow
1 * Horror
![]() |
| Deployment |
The Argent Defenders fielded a force they hoped could weather the attack consisting of:
1 * Veteran Sergeant
1 * Ogre Palace Guard
1 * War Wizard - Salamander Advisor
2 * Sergeants
2 * Paladin Defender
3 * Men at Arms with Spear
![]() |
| First Turn |
It should be noted at this point that the dice gods smiled kindly on the Melas Oneiros for most of the game whilst the Argent Defenders had obviously offended them. At one point a 3D8 attack resulted in 7 hits (if I recall correctly).
![]() |
| Second Turn |
![]() |
| Third Turn |
The good rolling on the Nightstalker side made the victory quicker and less bloody that it should have been but I think allowing them to concentrate their best melee troops against only a fraction of the Basilean army was the key. Taking out the War Wizard so early who offered the Basileans their only shooting option and the ever useful heal was also a bonus.
In the after action phase I came away with 24 Campaign Gold and managed to promote a Shadowhound to Rank 1. Probably the biggest bonus was not loosing any troops so I don't need to spend gold on replacements.
Each Vanguard scenario comes with a hook into the next KoW game so for winning the Herd get to field a free Infantry unit worth upto 10% of the size of the army deployed. In theory this would be a 300 point unit but as the most expensive Herd Infantry unit is 230 points the advantage isn't as big as it could have been.
A Tale of Two Forts: A KoW & Vanguard Campaign
With the release of Vanguard Stuart and I have decided to run a series of linked games of regular KoW and the Vanguard skirmish. The aim is to run a low maintenance campaign which adds a framework for interesting battles to be fought within. The last battle will be feature a siege using the suggested rules in CoK19. The campaign will be fought between the Herd & Salamanders with the Forces of Basilea and the Night Stalkers providing the elite Vanguard troops.
Background
The Herd
and Salamanders had lived peacefully enough alongside each other for many years
with only the occasional skirmish marking the passing time. This was until
recently when the leaders of the Herd had been visited by the Melas Oneiros who
described themselves as a group of emissaries from a distant land who wished to
aid the Herd as best they could. The Melas Oneiros seemed to be kin to the
Lycan who had retained the ability to shift shape and with their arrival the
Herd fury at the slights of the Salamanders grew and they decided to take
action against them. The first step was to build a fortified camp from which
they could launch attacks and the Salamanders would have been caught unawares
by the furious assault had not the Basileans divined the true nature of the
Melas Oneiros and dispatched the Argent Defenders to warn and aid their allies.
The first thing the Basileans did upon arrival was to urge the construction of
a second fortified camp to act as a bastion against the expected assault and
thus two forts where swiftly constructed on the border between the enemies. Now
both sides seek to gain the upper hand in the no-man’s land between the forts
with the Melas Oneiros and the Argent Defenders clashing in vicious small scale
battles whilst the Herd and Salamanders fight in larger battles whilst waiting
for enough troops to muster to launch a full scale assault into enemy lands.
Forces
Each side
will be made up of two armies, Vanguard and KoW.
The
Vanguard Company will consist of 500 points with Warbands being 250 points,
these must follow the standard composition as laid out in the Vanguard rules.
The KoW
army will consist of 3000 points (plus any bonuses from the Vanguard hooks) and
follow the composition and rules as per CoK19. Each army must also include one
Regiment representing the Vanguard unit that is attached to its side, this unit
counts as a friendly non-allied unit so can be affected by inspire and spells
etc as per any other unit in the army.
The
Vanguard Companies will follow the advancement rules as per the rulebook with
each Warband being made up of the forces available from within the Company. The
Balance of War and Helping Hand rules will be used so each side should know the
total number of Ranks it has in its Warband at the start of the battle.
The KoW
armies can be changed by up to 500 points per battle to allow some tactical
flexibility and to represent the flow of reinforcements into the armies. At the
end of each KoW battle the winner will be able to choose 2 units that took part
in the battle to upgrade using the CoK18 experience chart, once upgraded a unit
cannot change the artefacts it has purchased. The loser will be able to upgrade
1 unit with the same restrictions. Upgraded units can be left out and then
brought back but the normal rules around only one of each artefact allowed per
army apply. Upgrades cannot be transferred to other units and upgraded units
must stay at the same size as when the upgrade occurred, so no increasing
regiments to hordes or reducing hordes to regiments for instance.
Campaign
The
campaign will consist of alternating Vanguard and KoW battles with the winner
of the previous KoW battle being the attacker in the following Vanguard battle.
After 5 KoW battles the side with the most KoW battle victories will be close
enough to the enemy fort to launch an attack so will be the attacker in the
Siege game.
The battles
played will be as follows.
Vanguard
Battles:
1. Light the Beacon
2. Recover the Plans
3. The Power Stones
4. Burn the Stores
5. The Dragon’s Egg
6. Capture the Giant
KoW
Battles: all as per CoK19 apart from Eliminate which is as per CoK18
a. Push
b. Dominate
c. Control
d. Pillage
e. Eliminate
f.
Siege
Order of
Battles:
1 > a
> 2 > b > 3 > c > 4 > d > 5 > e > 6 > f
Terrain:
Will be
setup by the host with the visitor free to choose which side they wish to play
from.
The Winner:
History
will be written by the victor but the loss of a mighty fortress or the
destruction of a besieging host will surely greatly weaken the side who such a
calamity befell.
![]() |
| Quick piccy from the first game, can't all be text on one page! |
Subscribe to:
Posts (Atom)