Sunday 23 February 2020

Blood & Plunder: Breakthrough

I've not done much in the way of painting this week but I did get a game of Blood & Plunder in.


This scenario saw the English Buccaneers on the offensive trying to reach the Spanish Militia deployment zone.


The English force consisted of:

1 * Experienced Commander
2 * 10 man Veteran Freebooters
1 * 8 man Veteran Forlorn Hope
1 * 8 man Trained Militia
1 * 8 man Veteran Sea Dog with Musket & Grizzled Veteran


With the Spanish fielding:

1 * Experienced Commander
2 * 12 man Veteran Hostigadore, one with Grizzled Veteran
1 * 12 man Veteran Lanceros
1 * 8 man Veteran Milicianos Indios
1 * 7 man Veteran Marinero with Muskets


With the defenders setting up first the English massed on one flank and pushed forwards into the wooded area to gain cover and setup a fire-base. The Spanish made to move around on their right flank but found the open area to far to cross without taking heavy fire.


The game settled down to an exchange of fire in the center with both sides laying down a decent amount of shots but not causing massive casualties.


In fact this may have been the least bloody land game I've played so far with the Spanish not taking a Strike Point due to casualties and the English only taking one on the 5th or 6th turn, after the game had officially ended.


The English managed to feed their Forlorn Hope down the flank and into the scoring zone and despite some concentrated fire the Spaniards could not land enough hits to cause them to retire so they applied two Strike Points in turns 3 & 4 and the Spaniards lost the Strike Test and thus the game.


The Strike Test does reward playing the scenario over going just for kills but it did mean a rather abrupt end to a largely bloodless engagement.


As we had time to spare we played a few more turns with the Spanish being wavered and driven back and then recovering and the Lanceros finally managing to charge in against the Forlorn Hope but then only killing one of them.


I'm still not a fan of the Spanish and especially the Lanceros as they are an expensive unit that can go a whole battle without contributing anything, even the worst shooting unit can at least let you throw some dice and keep the enemy interested.


I did get some more Star Saga models painted and the second set of stairs for the adobe terrain arrived but I will save the pictures of that for next week. Though I did field the well that I completed last week and it can be seen in the middle of the village.


Also the League of Infamy late pledge manager opened this week for those wishing to get the game or some of the resin models being made.

Many more models are available


Sunday 16 February 2020

City Builder, Part 2

Continuing my spurt of terrain painting this week I put paint on plastic to complete the Deadzone terrain I'd purchased a while ago.


Deadzone uses a true line of sight mechanism for spotting so having plenty of terrain to break up those line of sight is important.
Mantic produce a good range of terrain boxes which thanks to the modular nature of the kits and a clip system is easy to put together and you can mix the bits up to make different buildings.


Deadzone is also works best on a battlefield with height so I built a few tower systems to put on the table.


Even with the height you don't want people to be easily able to bunker up so the towers need to be fairly open to allow indirect fire to hit most squares, this is useful as blast attacks can knock models out of the square they are in and fall damage is included in the rules.


All of the enclosed buildings have separate roofs so models can take cover inside them when moving across the battlefield.


I now have the terrain and two factions ready which means I can start work on the Rebs once I have completed the Mercenaries for Star Saga who can in fact be fielded as a list but not in competition games as they are not entirely balanced.


As I had the terrain out the Marauders and Mazon Labs decided to take a little look around to see what the new neighborhood looked like.


Thursday 13 February 2020

The Dead Rise Again, Again


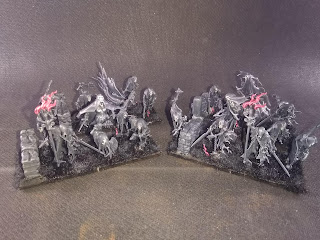
I guess it is in the nature of the Undead that they keep coming back even when you think them finished off. So it is with the forces of the Four Horsemen who I thought I had completed one month ago and another month before that.
Kings of War Undead Wraiths


I hadn't counted on Games Workshop releasing a new multi-part magazine set which included ten ghostly types for only £2.99. At that price I couldn't resist adding some Wraiths to my army and I even picked up one copy of the next installment to give me enough models to make four Troops worth.

Kings of War Undead Wraiths

The Wraith's have changed somewhat from the end of v2 mainly in a drop in speed from 10" to 7" and also a drop in points, 20 for the Troop and 15 for the Regiment. But they have gained Strider and are the only source of this special rule in the whole list. This helps them a lot as hitting on 4's for a hindered charge is much better than 5's.

Wraith Stats
In v2 they where often used to hop over enemy lines and then about face for a rear or flank surge, with speed 7 this is going to be much more difficult to pull off and having only 12 attacks on the Regiment means they really need to double or triple attacks to be a fearsome hammer.

Kings of War Undead Wraiths & Vampire Lord on Pegasus

However having Def 6+ and a good nerve means they can be an effective anvil and Lifeleech(1) will keep them in the game that bit longer as they are unlikely to be wiped off in one turn unless considerable resources are put into killing them.

Kings of War Undead Wraiths & Vampire Lord on Pegasus

So that's all the Undead I have at present with no more on the table and no more planned unless I see a good lot of cheap Trolls...

Monday 10 February 2020

Attack the Block

Having completed the adobe buildings last week a game of Blood & Plunder seemed the ideal way to get them on the table, so we played the Raze scenario.
This scenario sees the attacker trying to burn buildings (marked with red tokens) whilst the defender tries to stop this happening.


The scenario rules are such that the attacker only needs to destroy one building in order for the defender to start gaining a strike point at the end of each turn and if no buildings are alight then the attacker starts gaining strike points after the third turn.


Mick rolled highest to see who would be the attacker and I setup my defenders in the village ready to try and stop the English from setting fire to it. The first turns saw the English push forwards and start laying down some accurate fire whilst my Spanish responded back with less effect. The English are generally better shots than the Spaniards and the Ball & Shot special rule most of them have make this even more pronounced at ranges under 12".


The English Sailors then charged my central unit who badly flunked their defensive fire and routed the Spaniards including my commander. The Spanish Lanceros then tried to charge the Sailors but got driven off with heavy casualties first by the Sailors and then by a supporting unit of English Freebooters.


With the English Sailors looking to finish off my Commander I committed first my Sailors who had been on top a near by building and then my Indian militia to kill them off and save my Captain.


During this mass brawl the English Forlorn Hope had managed to set fire to one of the buildings and the two units of Freebooters had been shooting my Spanish up to good effect.


The English did get a little over-eager with the shooting and left themselves vulnerable to charges and I got first the Lanceros and then the Indians into melee. The Lanceros made heavy work of killing the Freebooters they had contacted but did keep them moving backwards over the next two turns whilst the Indians wiped out the Forlorn Hope.


 But by the end of the last turn the English had pulled out an unassailable lead and despite a last gasp spurt of casualties they limped away with a win.

 
Both sides ended the game severely mauled by the other and had taken over 2/3 casualties, the bloodiest game we have had so far.


I also did some work on a mono-cycle for Deadzone which I picked up at the Mantic open day.
It is treated as a piece of equipment so in order to make it as flexible as possible I mounted it on a base with a cut-out so a model can be added on to count as riding it.


At present the Marauders cannot take the mono-cycle as part of their equipment but an Orc can but dream...


It can however be used by the Rebs and Mazon Labs so should see action with one of those factions. As you would expect models on a mono-cycle are very fast but cannot climb buildings so can add an extra level of mobility to a Strike Team.


Sunday 2 February 2020

City Builder

This week I've taken a quick break from models and painted up the buildings I got from the Fogou Models Kickstarter campaign. I'm not sure when general release is but I'm sure it cannot be far off.


The buildings come cast in yellow resin with no release agent so they can be painted straight out of the box with no washing. The kit came with wooden or metal doors and I opted for the wooden ones as I doubt I will be using these in a sci-fi settings.


For the paint job I undercoated in tan yellow and then hit the buildings with some Army Painter flesh wash followed by a desert yellow dry brush and then a bone yellow dry brush, this gives a decent variation of colour across the models.


Part of the Kickstarter bonuses where two free standing door facades which can be added to buildings to represent more elaborate houses.


All the buildings come with removable roofs and the smaller buildings can be stacked on top of the larger to create a high rise village.


I haven't yet got a specific game to use these in but they could feature in various theaters of war from early ancients skirmish games such as Clash of Spears, through the Crusades for Saga and into the First World War in Blood & Valor.


So lots of scope for use in the future and some interesting periods to think about buying more lovely models for!