Saturday 30 January 2021

Halpi's Rift: Kill the Bard

This week saw the Vanguard companies clash in a effort to seize the Lute of Insatiable Darkness from a wondering minstrel. The sides would need to re-kill the minstrel and then take and hold his instrument by the end of turn 5.

The opposing forces start in opposite corners of the table with the bard moving along the road, at the start of each turn a dice roll decides how far the bard moves. One rule I don't recall noticing before is that 1/2 of each warband needs to enter the field of play starting at the beginning of turn 2.


The first move saw both sides move up some with both commanders opting to bring on their fastest troops in the second wave.


Turn 2 saw some more manoeuvring and Akatasos (former Kingdom of Men hunter) managed to kill one of the two grunts the Men had pushed towards the bard. The living KoM hunter managed to get a wound on the bard


During Turn 3 both sides mostly concentrated on attacking the bard but Akatasos did manage to kill the second KoM Grunt. The Undead charged in two revenants and a raised Skeleton and the KoM a Foot Guard. The bard managed to survive the assault but took a couple more wounds.

The Bard and his Magic Maracas

Turn 4 saw the bard skip a little further and be group charged by the Undead Revenants and Skeleton who where in turn charged by the KoM Leader and Foot Guard. In an impressive display of defensive ability no one died (or re-died)
With the KoM finishing their activations well before the Undead it left Radolf able to charge in and finish off the bard and then claim the lute, it also meant that his back could be covered by Pascal (Soul Reaver) and another raised skeleton.


The start of Turn 5 saw the Men try to shoot down Radolf and only cause one wound, he was then able to skedaddle out of range of any pursuit and claim victory for the Undead, we called it a day at that point.


This was an unusual game in the low number of casualties caused, only 2 KoM Grunts and the bard died and not many other models where wounded. It does mean the Undead have the benefit of the Lute in the next big battle which will be Salt the Earth. It will be the first time either of us have played that scenario so that should be interesting.

Sunday 24 January 2021

Halpi's Rift: Invade

 This week's game in the Halpi's rift campaign saw us fielding the large armies again, this time on the Empyrean Plane. The special terrain was a central Spire with the Inspire (Self) aura and Healing Woods. The woods healed you for one point of damage if you started your turn in them. The Plane special rule was Winds of Change with effected casters meaning that if they ended their move in their own half of the table they took damage (starting turn 2) but added 1 dice to any spells, and if they ended their move in the opposition half they healed damage but removed 1 dice from any spells.


We both used the same armies as in the last battle which meant the KoM had the advantage in unit strength 23 to 21 over the Undead. 
The KoM took the first move on Turn 1 which saw both sides push forwards. The scenario totals up the amount of unit strength you have across the centre of the board at the end of the game so you don't want to be caught in your own half of the table if possible.


Turn 2 saw the KoM launch attacks on both flanks, the Undead left flank held but with heavy casualties.


The right flank did worse with both Troops of Wraiths being removed. I had expected them to hold for one turn at least with all the charges being hindered, but some good nerve rolls saw the Men take them off.


In the Undead phase of T2 a double charge into a Knight Regiment which could have stabilised that flank caused massive casualties but then a double 1 left Knight's devastated (only attacking with 1/2 the normal dice) but still in the game.


On the Undead right the Revenant Infantry tied down and wavered one General on Winged Beast (via a double 6 on the nerve test) and the Goreblight was redeployed via a chain-surge to meet the threat.


On Turn 3 the Men removed both Revenant Cavalry Troops whilst the Revenant Cav Regiment held firm having healed back most of it's damage.


The lines clashed in the centre with the Zombie Horde holding on despite taking massive causalities from the Pole-Arm Horde. On the right the Revenants and Goreblight held on.


Turn 4 proved to be the last turn as the Men cleaned up most of the remaining Undead units. The right hand Troll Horde fell in one charge to a General on Winged Beast and the Revenant Infantry on that flank also were returned to the grace.


In the centre the Pole-Arm Horde cut through the Zombie Legion and the Revenant Cavalry Regiment was also removed by a combined charge of a Knight Regiment and The Captain. With the Undead vanquished we called it a night at that point.


From an Undead standpoint it wasn't a great night but we can draw comfort from knowing that the KoM had an unusually hot night with the dice and managed to remove some units which normally would have fought on. Such are the foibles of war. 
Onwards to the Ethereal Plane next week, the home of the Nightstakers.


Sunday 17 January 2021

Halpi's Rift: Keep the Flame Alight

This week saw our intrepid warbands venture onto the Empyrean Plane, the home of the Shining Ones. The Men started with control of the beacon and wanted to keep it alight in the hopes of attracting some Celestial intervention, the Undead wanted to prevent this from happening.


We'd played this scenario before and under the original rules it proved very difficult for the attacker to win, this time we played the FAQ'd version. In the updated version it was only a short action to light/douse the beacon and this could be done even if an enemy was in contact with the beacon if the model taking the action was not engaged with the enemy. This makes it much easier for the attacker to win and gives the defender more work to do.


The first move saw the Undead push up and the Men largely hold position. The Men were shocked to see that one of the Undead archers looked surprising like Akatasos, a former brother in arms who had fallen and they thought been safely buried after the last battle


In the second turn the Men tried to peg the Undead back by charging three foot guards into their lines, the Undead moved their left flanking force back into the centre. Two of the Foot Guard were cut down in short order and the Men also took some pot shots into the archers sending Akatasos back into the grave from which he was raised.


In the third turn the Undead managed to finish off Foot Guard and moved forwards to position themselves for charges in the next. The Men rushed towards the beacon and also put some withering fire into Radolf (the werewolf). Radolf had been incapacitated in the two previous battles by the ranged fire of the Men and this time he was knocked down but not finished off.


In the picture below we can see the start of round 4 where Radolf is on his feet once again and just about to charge in and kill the Ogre warrior in on fell swoop, he was then finished off by Senban the Men's leader. The remaining Undead archers also managed to remove one of the Men's Hunters.


By the end of turn 4 the Undead had pushed up to within charge range of the Beacon and also caused enough casualties to take the Men over their break point. With no way of being able to stop the Undead from putting the beacon out the Men withdrew from the field rather than face mounting casualties.


With the battlefield secure Leonard the Revenant healer in the warband was able to work on Radolf who was once again brought back from death with no ill effects, the others in the warband have now started to call him Radolf the Undying. Necromancer Hare was also able to use his arts to reconstruct the corpse of Akatasos so he could be compelled to fight again. Things did not go so well for the Men as the Newbie Foot Guard who had just been recruited into the Warband perished from his wounds and some of the others received some lasting wounds.


I also completed the Great Winged Half-breed for Mr T's Abyssal Dwarf army, this was a surprise gift for him to add into his army. Knowing that his painting speed is not the highest I thought I would tackle the large part of the model and leave him to work his magic on the rider.


The head and saddle are metal and add a lot of weight to the model so I glued them together and painted them separately from the rest. With hindsight it would have been easier to paint the wings before gluing them on as well but it wasn't a massive issue. I went largely with the red & black studio paint scheme and used the new Army Painter metallic colours for the scales and then mostly contrast with a black wash and dry brushed highlights for the rest. Once all stuck together it's a large and imposing model and hopefully with grace the field of battle once Mr T has enough Abyssal Dwarfs to play a game with.


Saturday 9 January 2021

Saga: Carthaginians

 I recently completed all the extra models to convert the Clash of Kings Carthaginian starter force in to a SAGA army. In fact with the extra Greek models I have I can probably also field an Iberian & Greek force with a little proxying for the Iberians.


The Carthaginian list reflects their reliance on mercenary contingents by dividing the troops up into Citizens, Contingents, and then Levies. You can use any dice to activate a Citizens unit and need a Common or Rare dice to activate your Contingent units.


As can be seen above the Contingent troops are all Warriors whilst the Citizens include Hearthguard, Chariots and Elephants as well. A players army must include at least one unit of Citizens but the rest can then be of any type. Getting the correct mix of home grown and mercenary units is important in this list as some of the ability effects vary by unit type.

Some new Iberian Cavalry

Citizens can also use Contingent troops as a human shield using Blood Price, useful for protecting your Hearthguard but even better for protecting your Elephants and Chariots. You could also use a unit of Levies to soak up the damage as well. A unit of Javelin Levy who could advance and take a free shot alongside the Elephants would seem a good tactic. I will try and cover the two new units in another blog post in the future, they look like fragile damage dealers to me at a quick glance.


As mentioned the Carthaginian battle board has several abilities who's effects vary depending on the unit type. So Coordination can be used to boost the attacking power of your Citizen troops and boost the defence of the Contingent troops. All have this common theme in place, so you have more abilities to help your Citizens cause damage and more to make the Contingent troops stay alive.


 I presume this is to reflect the use of Hannibal's Contingent troops to absorb the Romans charge whilst his Citizen troops enveloped the flanks.


The board also has an ability to encourage the Carthaginian general to invest more heavily in mounted troops (including Elephants) than a Roman general would. Being able to activate 3 units with just one dice is very powerful as it allows you to concentrate dice on other abilities on the board rather than movement activations. Even being able to activate 2 units for one dice is good so foot armies can still make good use of Encirclement


The Carthaginians also have an ability to boost their shooting and deprive the enemy of any cover bonus they may have. This again would make taking a unit of Javelinmen alongside Elephants extra potent, not forgetting that the Elephants also have a ranged attack so could benefit from this as well.


With the inclusion of unit type specific ability effects and an the extra option of Elephants & Chariots the force selection for Carthaginians and the battle board play is more complicated than the Romans. I think it will take a fair few games to work out exactly the best way to tailor the force and this will change depending on your likely opposing force. On the bright side as I don't own any Carthaginian Chariots at least that is one option that I don't need to worry about. 
Perhaps a good starting force could be:
2 points of Hearthguard in 1 unit
1 point of Mounted Contingent Warriors with Javelins in 1 unit
2 point of Foot Contingent Warriors in 2 units
1 point of Levy Bowmen in 1 unit
It feels like the Citizens should be the fist in the force with the other units in place to shield them from harm and harry the enemy.
Then once you know the board a bit better you could swap 1 or 2 Elephants in for Hearthguard points.


Saturday 2 January 2021

Halpi's Rift: Push

 The next battle in our Halpi's Rift campaign saw the main armies gather for the Push scenario. This involved trying to carry loot tokens into the opposite half of the table, both sides start with the same number of tokens and an extra one (the green one) is placed in the centre of the board. The armies are setup before you roll for the number of tokens (we rolled 1 token) and carrying the token slows your unit down to speed 5.


The Kingdom of Men fielded the same army as last time

1 * Pole-Arms Horde
1 * Foot Guard Regiment
1 * Bowmen Troop
3 * Knight Regiment
1 * Mounted Scout Regiment
2 * Mounted Scout Troop
2 * General on Winged Beast
2 * Wizard on Horse
1 * The Captain
14 Units - 23 Unit Strength

With the Undead making a small change to bring in a Lykanis instead of the Goreblight

1 * Zombie Legion
1 * Revenant Inf Regiment
2 * Wraith Troop
2 * Zombie Troll Horde
1 * Revenant Cav Regiment
2 * Revenant Cav Troop
1 * Lykanis
2 * Revenant King
1 * Liche Queen
1 * Necromancer
14 Units - 21 Unit Strength

I like to have a fast nimble Hero with Unit Strength who can carry/capture tokens in the army for token based scenario's, though I have noticed in KoW v3 that you lose Nimble when carrying a token so they are slightly less useful than in v2.


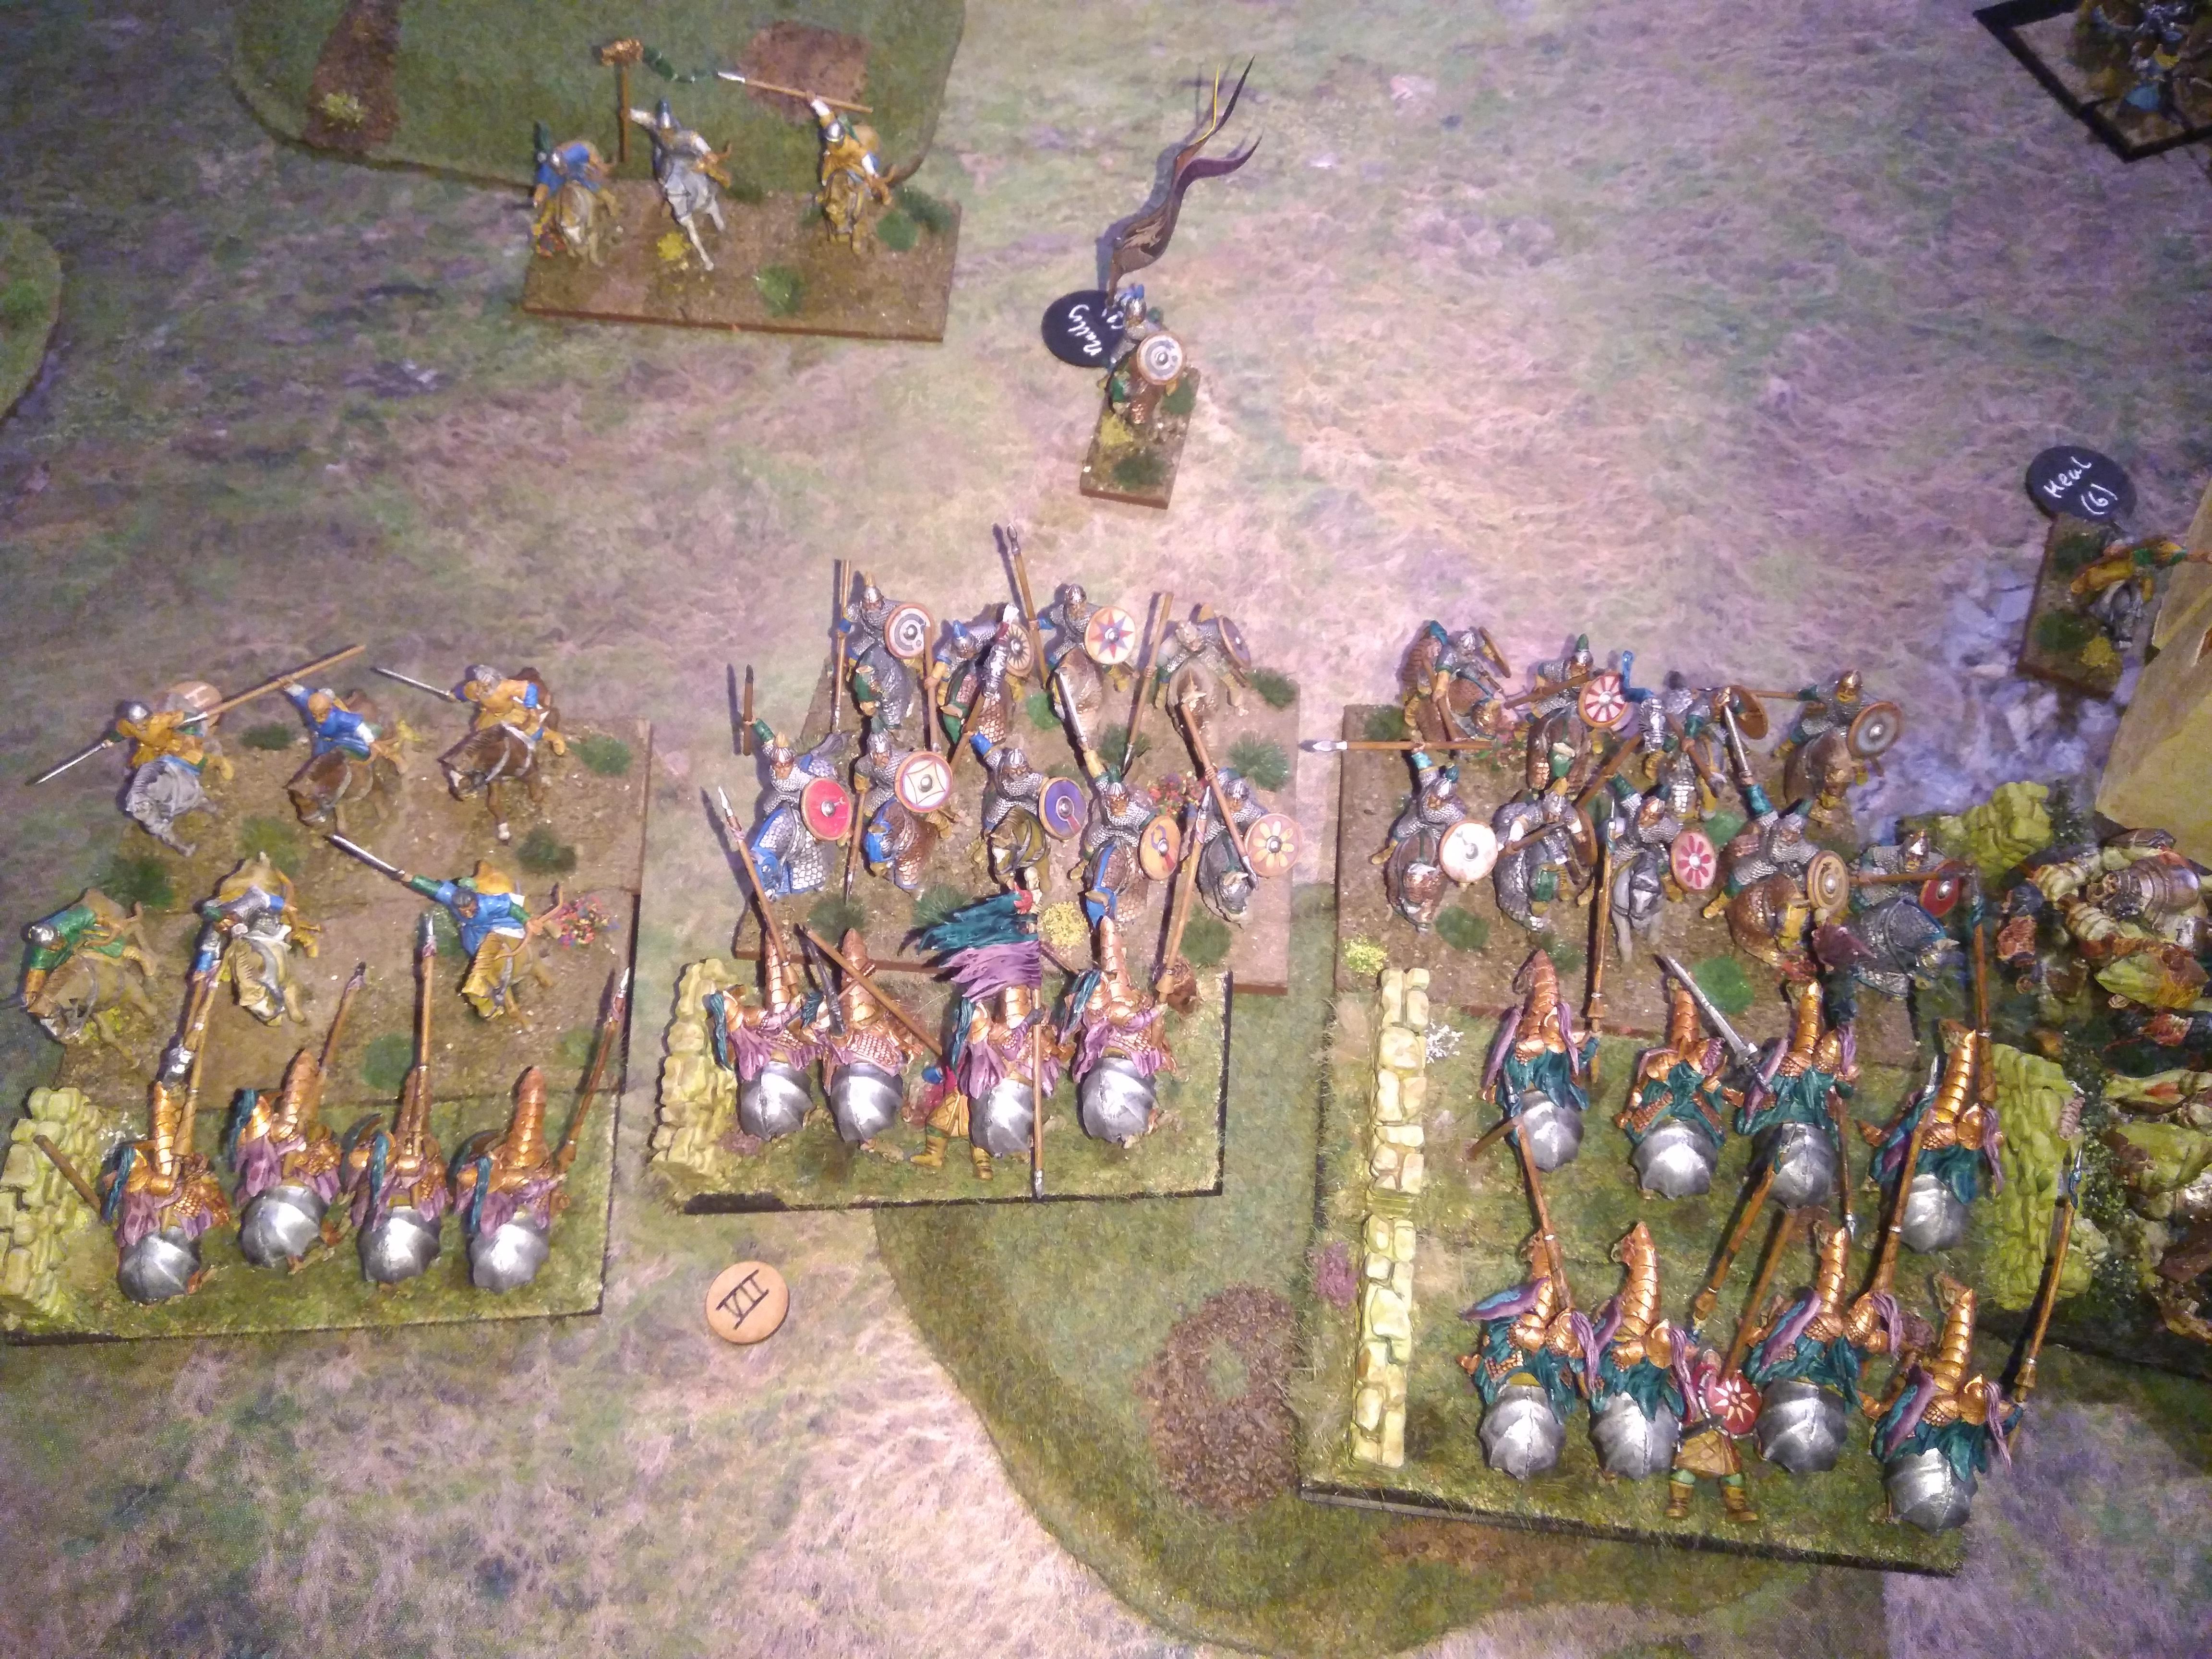
Both armies placed their large infantry blocks opposite the bonus token in the centre of the table with the KoM placing their starting token on the Pole-Arms Horde and the Undead entrusting theirs to the Lykanis. The Undead won the roll for first turn and opted to move first, pushing up across the board.
Before the game started the KoM of the chance to move d3 units via the Captain's special rule and I think at this point they made a mistake, rolling a 3 meant they could have repositioned the Pole-Arms onto the Undead's left flank and had a pretty much uncontested route across the table to secure the victory points. They choose not to do this and instead moved a couple of units to allow a Wizard a clear shot.


The Men also pushed forwards and one the Generals on Flying Beasts took a bait charge into a Revenant Cav troop. In fairness to the Men the Gods of Dice where not with them and right from the first turn the shooting caused almost no damage and the General failed to rout the Revenant's when he should have done so, this rather set the tone for some below par rolling and the Undead retaining units they should have lost.


On Turn 2 the Undead took the charges that had been left by the Men and managed a flank surge/charge by the Revenant Cav Regiment into the General, this wiped him out. 


Elsewhere the Undead engaged the light cavalry of the Men and Mhorgana after missing entirely on her first turn of shooting managed a good Blizzard blast against the Bowmen Troop which helped wipe out the Zombie Legion in the last battle and routed them in one round of shooting.


In the Men's turn they fought back but a series of poor rolling which included causing only 1 damage to the Revenant Cav Regiment saw them only rout 1 Wraith Troop. The speed of the Undead advance had meant that many of the KoM units had to charge from out of hindering terrain so having to hit at +1 and also the Knight's losing 1 Thunderous Charge really helped mitigate the initial damage they normally rely on.


Turn 2 settled into a grind with both armies pretty much fully committed along the line and neither side able to break through.


One Regiment of Knights did get a good charge in against a Zombie Troll Horde but again fluffed the nerve check so they stayed on.


Turn 4 saw the Undead start to crack the KoM lines with the Revenant Cav killing off the Knight Regiment they faced and then turning in towards the flank of the Men's lines. The Zombie Trolls on the Undead left routed another Knight Regiment with the help of a Wraith Troop and some  good nerve dice.


In the centre the grind continued with the Men rolling double 1's to leave the Zombie Troll Horde on the table and thus being unable to make it fully across the middle of the board with their token.


The Captain did manage to finish off the other Zombie Troll Horde but he couldn't stop the Lykanis from fully crossing the half way mark.


With the KoM having no way of securing victory we opted not to play out the last turn and the Undead managed a 2-1 VP win.


The dice certainly didn't help the KoM during this battle but I think the initial decision not to move the token carrying unit to an unopposed position may have been the factor that put victory out of reach for them.