Sunday 27 May 2018

Forces of Basilea

No SAGA this week so I have had a chance to continue painting up my Chariot Horde for the Herd and also to do some planning for another KoW army.
My regular playing partner Mick is not a fan of fantasy so I hope to tempt him into sharing my love of KoW by building up a semi-historical army which has a few fantasy element thrown in. In order to keep costs down and also not add to my painting pile the plan is to build an army using the various Greek models I already own.
This should mean that not only do I get to see the models I first painted when I started gaming again on the field of battle but also that the Mythic Battles models serve a dual role.

Homeric Greeks & Trojans
All I should need to do is create some bases for them to go onto and the army should come together pretty quickly.
Looking through the lists available I decided that the Force of Basilea would be the best fit and as they have two good formations under the latest rules additions it should be easy to build an army around those.

Core List
I have plenty of infantry but some cavalry will be to be purchased and that should be the only extra outlay needed for the army to come together. The core list includes a solid high nerve infantry block and fast hard hitting cavalry units with healing support.

Formation Benefits

The two formations build on these strengths and help the two parts of the army excel at their roles. My plan is to use the Gods from Mythic Battles as the Elohi and if I can think up a way to make them look like they are on Mount Olympus then that will be great. I also need to flesh out the rest of the army and want to get around 2000 points on the table as that should give a decent sized army to start learning the game.

I did manage to complete a few models this week but I'm not sure what to use them as at present so they have not been based up.


These came along with the Elephant models I am using in the Herd army but I cannot decide what to use them as. I may save them to be used for a Herd force for the KoW skirmish game Vanguard that I backed on Kickstarter.
Well back to the chariots now, the hope is to get them pretty much done over the long weekend.

W.I.P


Sunday 20 May 2018

Raiding Season Week #2

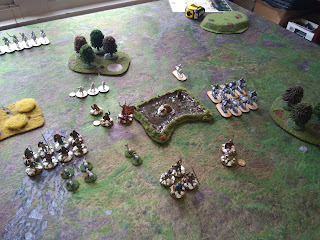
For Turn 3 of the Raiding Season campaign the Norman raiders decided to go South and with the Rus deciding to defend South 2 and the Normans raiding South 1 a battle was fought.
The battle was the Crossing Paths scenario from More Saga Battles and in a similar vein to last week saw both sides trying to escort some baggage across the table. Victory Points where gained for getting your baggage off the opposite side of the table, stopping your opponent from doing so, and the destruction of entire units.

Initial Setup

The Normans opted for an all mounted force and field three points each of javelin Hearthguard and javelin Warriors. The Hearthguard formed two units of six and the Warriors three units of eight.
The Rus went with one point of Hearthguard, four points of Warriors ( 2 units of 10, one of 12 ) and one point of Mercenary Scouts with javelins.


The opening moves saw both sides perform a general advance with each side seeking to move the baggage down their own left flank whilst looking to disrupt the enemy advance on the right.


The mercenary Scouts allow any unit to ignore the movement penalties for any area of rough ground they entirely occupy so the Rus looked to pass the baggage through the wood and also managed to get a few shots off against the Normans.
At this point the Rus forgot that the unit of Hearthguard ( bottom left corner ) could still maneuver for free so they stayed rooted in place.


The Normans pushed forwards and let loose some shooting causing a few casualties in the centre and also pushed up a unit of Hearthguard on their right flank.


The nature of SAGA is that you generally get one big charge off a turn and this the Rus did on their left with a unit of Warriors killing four Hearthguard with two losses in return. A little bit more shooting in the centre encouraged the Normans to back off.


The Normans then decided to counter-charge with the remaining Hearthguard and despite combining that with some shooting to seriously deplete the Warrior unit both Hearthguard died and the unit was wiped out.


Over on the Norman left they had been making steady progress towards the table edge until another effective charge almost wiped out the Warrior unit leading the advance, this left the baggage train somewhat exposed.


In the centre things had reached a stalemate with the Normans not willing to risk another unit and the Rus needing to spend the activation dice on their right flank. The Normans had managed to finish off the weakened Rus Warrior unit which meant it was one all on units killed. The Rus Hearthguard had finally advanced though.


On the Rus right they had managed to wipe out the last remaining Warrior to go into a 2 - 1 lead on units killed.


They then withstood a charge from the remaining Norman Hearthguard and forced them to retreat back with a few casualties.


At this point I managed to forget to take a final photo as on the last turn the remaining Warriors on the Rus right charged the Norman baggage but failed to kill them off.
This left the Rus as the winners on 2 units vs 1 killed and also just ahead on slaughter points. Over all it was a very close game with some good defence dice on the Rus side keeping units in the fray, it could easily have gone the other way though.

Campaign Situation after 3 Turns

Sunday 13 May 2018

Raiding Season Week #1

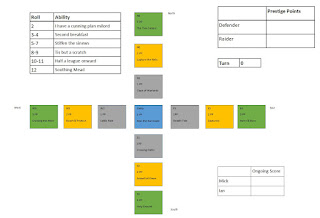
Saturday afternoon saw the start of our new Raiding Season SAGA campaign. Mick had won the roll-off and decided to take the raider roll to start off with. I will be using my Pagan Rus and Mick is fielding his Normans. In the first turn he raided west and I choose to defend West-3 whilst he raided West-1 so he got a battle free raid in. On the second turn he again raided west and I again chose West-3 and he chose West-2 so he gained the Prestige Points for that square as well but we fought a battle.

The Starting Map

The Scenario was Escort & Protect from the More SAGA Battles list and as the defender I took the role of the escorter. My mission was to move at least two of the three 'baggage' trains across the table and make my escape. For the scenario I was reduced to 4 points of troops and went with 1 point of Hearthguard and 3 points of Warriors. Mick went with a Breton style force of 3 points mounted Hearthguard with Javelins, 2 points mounted Warriors with javelins and 1 point of mercenary Gall-Gaedhill. The Gall-Gaedhill are a unit I've not faced before, they are a fierce melee unit that benefits from extra attack dice when they charge but aren't so scary on the defence.


Both sides opted to put out plenty of terrain with the Normans trying to channel the baggage trains which could not enter rough terrain and the Rus hoping to reduce the Normans superior ability to maneuver.


A general advance was performed by both sides in the opening moves with the Norman Warrior cavalry pushing furthest forward between the fields and pond.


The Rus pushed further forward on the left and tried to slow the Norman advance on their right.


The Rus then charged and destroyed the Norman mounted Warriors in a furious assault which saw the Normans wiped out for no loss. This set a bit of a theme with the Rus generally rolling well on their defence dice.


The Normans then set loose the Gall-Gaedhill who pushed the Rus Warriors back but did not follow up the success.


The Rus counter charged and pushed the Gall-Gaedhill back but with significant casualties on both sides. Whilst this was happening the Normans had been stalled on the right flank and the baggage had slowly been grinding up-field.


After a couple more combats the Gall-Gaedhill were wiped out and the Normans started to force through on the right.


At this point the battle hung in the balance with the Normans still having two fresh units of Hearthguard and the Rus force dwindling fast.


The Rus still had one more good combat in them and the last Warrior unit managed to charge and almost wipe-out the blocking Hearthguards to clear a path whilst the Rus rear-guard further slowed the Normans.


One final Warrior charge by the Rus wiped out the last blocking Norman and the baggage train was free to flee the battlefield. Whilst this was happening the Normans mopped up the rear guard and took the secondry objective.


The battle ended with the Rus both winning the scenario and also leading on Slaughter Points whilst the Normans claimed the secondary objective so the Rus get two rolls on the bonus ability table and the Normans one.
The scenario was an interesting one and as we hadn't played it before both sides went into somewhat blind. I think the Norman plan of putting extra terrain down may have backfired as it limited the amount of troops they could focus against my forces and did not allow them to take full advantage of their superior mobility.


Situation after 2 Moves


Saturday 12 May 2018

The Eagles are Coming

This week I have completed my Horde of Giant Eagles for The Herd and they turned out pretty well. It isn't often that my ability matches the initial vision for a unit but in this case I'm rather pleased with the results.


The idea was to show the Horde in the act of attack and try to mount at least one of the models onto a target on the ground.


Using an Ogre model from Mantic's Ogre Chariot kit allowed me to create a strong base for the Griffin which as it is a Reaper Bones model is actually pretty light.


The fox and chickens had meant to be used as part of my Stampede as I had originally intended to make it a Chickenpede rather than the Boarpede as it ended up. They help to add some interest to the otherwise empty area under the attacking Griffin.


As a fast moving unit the ideal use for these is to exploit flank and rear charges.


I also completed a Bronze Bull to be used either as a wingless Chimera or a unit filler for the Warrior Horde.


Monday 7 May 2018

Man the Barricades

This week we tried out the Man the Barricades scenario which I created for the Raiding Season campaign. It is the optional season finale for the raiders in which they can try to pick up some extra Prestige Points.


Man the Barricades:
The raiders are starting to slip away as the defenders have finally built up enough of a force to assault the camp, will the defenders manage to overrun the rear guard and exact revenge ?

Setup: The raider sets up two buildings within L of their table edge and also has 4 M length walls they can deploy. The raider cannot deploy any other terrain but the assaulting army can deploy terrain as per normal and the raider can roll to affect one piece as per C&C rules. Walls count as low, solid cover against shooting for units with over half their models touching the wall. Moving over a wall incurs one fatigue but does not slow you down. Units touching the wall that shoot do not count their target as in cover even if the target is also touching the wall. The buildings count as Ruins as per page 48 of the Saga v2 rules.

The raider starts the fight with 4 points from their Warband and sets up with L of their table edge. The assaulter starts with their full 6 point army and sets up within L of their table edge after the raider has finished deploying. The assaulter has an Endless Warband, use the C&C rules on page 108.

Victory Conditions: The assaulter wins if they wipe out the raiders before the end of turn 6 or occupy both buildings. The Raider wins if they kill the assaulters Warlord, otherwise the raiders get a bonus PP for each turn after the sixth the battle continues.

Length: Endless or until one of the victory conditions is met.


The Normans decided to play the attacker so my 4 points of Pagan Rus setup in the cover and awaited the Norman onslaught. The Normans started positively by moving quickly to the defences and then settled into trying to shoot the Rus out of their positions.


Due to the extra defences offered by the cover this caused little damage to the Rus and the Normans did not decide to press on into melee so after 6 turns the Rus had only lost 2 Warriors.


I'm not sure the game really tested out the scenario but it did show that you would not win it by relying on shooting. It also made me realise that even with a bottomless warband the distance from the assaulters base edge to the buildings would mean that the assaulter would struggle to make use of the extra numbers. I think that rather than entering from the assaulters base edge the reinforcing units should also be able to enter from either side upto halfway from the assaulters base edge.

We also rolled off to see who would be taking which role in the first Raiding Season with Mick winning and deciding to be the raider first. We then assigned the scenarios via die roll to the map.


So we are all setup to start the campaign with the Normans needing to decide a direction they want to raid first and both sides needing to draw up 6 point lists.

This week I have also made some progress on my Giant Eagle Horde for The Herd with most of the painting being completed.


The models have had the Quickshade applied and then need to be varnished and arranged onto the base.