Sunday 29 November 2020

The Four Horsemen: Don't Look Back in Anger

 The original concept for my Four Horsemen Undead army saw the section lead by Death painted in grey-scale with the idea that they would represent soldiers who have had their souls reaved from their bodies. At the time I was happy with the outcome, though it was suggested that a splash of colour may help the overall look.

The Original Scheme

As you paint through an army, especially one done over several months you pick up different ideas and by the time I reached February and painted up the Wraiths I'd moved onto a darker scheme with lighter highlights and a dash of colour. I really liked this scheme and wanted to transfer this over to the original models when I worked out how and had some time in the painting schedule.

New Style Wraiths

So with nothing else on the blocks to paint at present I've been back and had another look at what can be done. In the end it was actually very easy and much quicker than I anticipated to complete, being done in only 1 1/2 days.

New Style Soul Reaver Infantry

A simple black wash achieved the first aim of making the models much blacker overall and it didn't take long to work through the four regiments and four individuals I had. I left the faces and arms in the original colour as much as possible to draw a distinction between what was and wasn't flesh (well bone in some cases).


This helped bring a real depth to the grey scale scheme which I then reinforced with a dry brush of white. The main obstacle in the process was the fact the models where on the base already which made it harder to get to the bits in the middle of the bases that at the edge. It did have the advantage of forcing me not to try anything too fancy that couldn't be reproduced on the hard to reach areas of the models.


After that I went over some areas with red in order to pick out a few spots of interest and catch the eye. I resisted the temptation to go with red eyes on everything other than the dogs and decided to go with weapon edges and a couple of details on the shields.


A quick application of matt varnish over the top and that was job done, I had expected it to take much longer than it did to achieve a pleasing effect, but a simple black wash really worked wonders in the end.

New Style Soul Reaver Cavalry

So now the Soul Reavers are ready to ride and march forth to do what they do best, punch face, very hard.


Death and three Vanguard Soul Reavers


And one final word, yes Stu, they do look better with a splash of colour.


Saturday 28 November 2020

Star Saga: Reinforcements

 The Star Saga Character & Mission creator expansion not only comes with information and cards to write your own missions, but also six new mercenaries to play with.


As with all the other Mercenaries these can also be used in Deadzone and some are tied to specific factions. 


Kizai is a support merc with a heal similar to Kira but not quite as good and an interesting ability which allows it to move a target model extra squares. Kizai's Feat heal has a larger range than Kira's and doesn't require a role, so it is more reliable.


Orion is in the same vein as Capt. Erika, a straight up ranged damage dealer. Rolling 4 defence dice and having no wounded state does make Orion tougher than the Capt. though. he does pay for that by being more expensive and only rolling 2 melee dice.


As a Teraton, Kur Keela is linked to the Reb faction and can be fielded in a Reb strike team. He has a teleport ability which is the same as Deadzone and what he lacks in shooting & melee he makes up for in tech and mobility.


Hund is another Reb faction merc and in common with other Rin he is a ranged specialist who makes use of his four arms to use multiple weapons. He always gets two attacks each turn which is no doubt handy for cleaning out minions. He also gets an upgraded Pew Pew Pew (Capt. Erik feat) in that he can fire three times and then take a move as well.


Shade is a Marauder who likes to get up close and personal, he can also be taken in a Marauder Strike Team for Deadzone. His critical hit special is nice but I'm not so sure about his feat, becoming crippled means he loses out on 10xp on any mission he uses the feat, also he cannot move once he has popped it.


Last up is Kr-Om3 a multi-stance defence robot. His ability to add extra defence dice onto adjacent mercenaries and lay down a decent ranged attack makes him an interesting support choice.


That's all the models for Star Saga painted up for the moment and ready to be deployed into a mission. We seem to have a good balanced team at present in our Sunday afternoon games so I'm not sure if any of these would muscle themselves into contention.


Sunday 22 November 2020

Star Saga: More Terror In The Deep

This week I completed the rest of the Terror in the Deep expansion for Star Saga with the models now ready to travel back to Cirencester to be ready for the next campaign.

The box included The Blight as a leader choice for the Nameless in Deadzone, presumably he/it is a boss for Star Saga. He comes equipped with what is effectively a range 3, AP1 flame thrower, which is rather nice. The Blight is also very handy in melee with a AP2 melee weapon and a Fight of 4+. His special is the ability to give any active model a range 2 free 'flamer thrower' attack, good for quick models looking to lock down the enemy at close range.


Terror on the left, Blight on the Right

The Terror is a specialist choice in Deadzone who again is a melee fighter with his Frenzy (1) special letting him reroll a failed fight dice and his Resilient (1) rule allowing him to reroll a failed survive dice. A speed of 2-3 also means it can get around the board quickly and would be the ideal partner for someone with the Triclinic shard special we saw last week. 


The Gunslinger is the third and final troop choice for the Nameless and as the name suggests is a ranged troop specialist. They do only have a range of 3 with their twin pistols and with costing 5 more points than the Inker/Scuttler they may not be a very popular choice in a list that probably wants to fit lots of specialists in.


The final specialist is the Assassin, a fast and mobile melee choice. It has the backpack which allows it to fall any distance without taking damage and also scale walls and jump one cube wide gaps. With AP2 and the ability to reroll 2 failed Fight dice (via Frenzy (2)) this fighter can cause some real issues once it gets into close combat.


Last up is the Goliath, I think they could have gone with a more scary name for what is a massive hunk of a gribbly. In Deadzone this is counted as a Vehicle choice so needs 3 Troop's to be taken to unlock. In Star Saga it probably needs a big room to operate in so you may want to stick to the corridors!


As you might expect the Goliath is going to take a lot of killing, he has 4 wounds and armour 2 as well as tough (ignore the first wound on each attack) and with a Fight of 3+ he is going to be a nightmare to deal with in melee. A survive of 4+ means it won't be easy to shoot on the way in and it also has a ranged capability if it pulls up just short when moving in. 


It really is a big model so took a fair bit of work to get painted, I ended up doing the top two thirds first and once that was varnished doing the rest. This gave me a way to hold the model without rubbing the paint off as I went along.


And that is the entire expansion done, the models are much nicer to work with than the Rebs from the Devil's Betrayal expansion, many of which I felt lacked sharp details.


Next up are the Mercenaries from this box and also from the Character Creator expansion so we have a bit more Star Saga yet to come.

Sunday 15 November 2020

Star Saga: Terror In The Deep

 One good thing about the ongoing pandemic was the decision to get some online gaming in as a means to keep playing wargames. From this was born a Sunday afternoon gaming session which initially saw myself, Stuart, & Sam playing a D&D board game with a few Napoleonic Zoom games thrown in as well. We recently completed the D&D and started playing Star Saga, a Mantic games sci-fi dungeon crawler. At present we are playing through the base game with pits the mercenaries against the forces of Mazon Labs. 
One of the expansion boxes is for the Nameless and as this was the only one that was in stock I purchased it and have started painting up the models. The good thing with these boxes is that you can also use the models in Deadzone, so you get double use from the models. The Terror in the Deep box also contains a couple of Asterian mercenaries so they can be used with the new Asterian models I got for Deadzone.


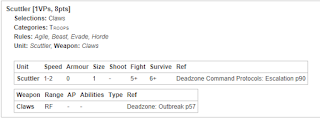
The first models out of the box are Scuttlers, a cheap Troop choice in Deadzone whose low profile should make them hard to shoot. I don't have the Star Saga cards for the models so have provided the Deadzone stats, I would imagine the Star Saga stats mirror those of Deadzone.


The Nameless have an aquatic feel and come in two varieties, the more crab like animalistic species and the squid-men who seem to be the brains of the faction.
I decided to try and differentiate the two sides by giving them contrasting colour schemes. Some of the models seem to blur the distinction so that allowed me to combine the two schemes to hopefully give a cohesive look to the faction.


Next up are the Inkers, again a cheap Troop choice for the Nameless. These are slightly worse at fighting than the Scuttlers but come with the Ink Sack special ability. 


This allows the Inker to deploy an ink cloud (smoke grenade) once whilst alive and automatically upon it's death. Ink clouds block line of sight through squares containing the cloud and give a -1 shoot dice penalty to shots passing through adjacent squares, very handy for getting your melee or close range shooters up the board.


The first Specialists I painted up are the Riflemen, it's worth noting that the names for the Nameless are those given to them by the GCPS (Galactic Co-Prosperity Sphere) military forces who encountered them. Presumably they have their own name for each other, though maybe not.


The Riflemen come equipped with the long range Crystal Rifle which has the Triclinic Shard special ability. This can be used to mark the shooting target and then gives a +1 fight dice bonus for any model fighting the target for the rest of the turn. If you combined with this the Rapid Fire ability which allows you to try and Pin a model you would then get +2 fight bonus dice. This is because attacking a Pinned model itself gives a +1 fight dice bonus. Remembering that a basic attack is always 3 dice showing how good a bonus this could be.


Last up for this week are the Ogres who are sporting a crab-beast feel. As with the Scuttlers I went with a nice bright blue & pink theme to make them stand-out. With the bases I decided to base them up for Deadzone with the same basing scheme I've used for the Marauders and Rebs, I can see these chaps hitting the battlefield in the future (once we can play again).


The Ogre is a Specialist choice with high armour and wounds and the Defender Shield ability. This gives him +1 armour (to a total of 3) and also adds +1 armour to any models in the same area as him. As he is size 3 (max total of size 4 in one cube) he can look after one size 1 friend.


He also has Armour Piercing 2 claws which should help him with cutting up even the most hardy of foes.


I have a few more models to complete for the faction including the mighty Goliath who is a big old chunk of plastic.


Sunday 8 November 2020

Kings of War: Invade

This week we got our third practice game in for Kings of War with the Kingdoms of Men and Undead this time playing Invade. This is a simple scenario with the Victory Points being worked out at the end of the game and 1VP being earned for each Unit Strength of a unit that has at least half it's base across the centre line in the opponents half of the table.
Unit Strength is determined primarily by the model count and cost of a unit, so single models are generally have 0 or 1 US and large expensive hordes 3 or 4 US.


The two armies where the same as last week apart from I added the Hammer of Measured Force to the Zombie Legion, this means it always wounds on a 4+, with no modifiers allowed. The two armies are very close in US with the Men have a US of 22 across 14 units and the Undead a US of 21 also across 14 units.


The first turn saw the Undead take the first move and shuffle forwards with the Liche Queen rolling well on her long range Blizzard attack and take off a Troop of Mounted Scouts. The Men also shuffled forwards and concentrated fire on the Zombie Legion.
The second turn saw the Undead move forwards again to try and limit the incoming fire and then the Men charge in across the whole width of the battle, they managed to break a unit of Trolls but the rest of the Undead line held on.


Over the next couple of turns the combat settled into a series of grinds which in general suited the Undead better, once again the Zombie Legion managed to keep going and killed a Regiment of Knights and then Regiment of Scouts.


On the Undead left a hardy Troop of Revenant Knights kept that flank jammed up and the Revenant Infantry ground down a General on Winged Beast. One big disappointment where the two Troops of Wraiths, one of which managed to cause no wounds over two rounds to a Troops of Mounted Scouts who routed them and the other who managed to cause minimal wounds in a flank charge into a Regiment of Knights.


The one thing this Undead list lacks is a hammer hitting on 3+, having everything hitting on 4+ means you can get some really bad rounds of combat when the odds worth against you, perhaps I need to look at getting a more reliable hammer into the army.


Once the Zombies had worked their way through the Knights & Scouts and the Revenant infantry and killed off the General the Zombies where able to charge across the centre line and the Revenants also charged across into the flank of some Knights.


With the Revenant Cavalry tying up another Knight Regiment that meant the Undead had just enough units across the centre to manage a victory.


The game was close all the way through with the Men coming close during rounds 2 & 3 to breaking the centre of the Undead lines, had they done this then the out come would have been very different.