Sunday, 18 July 2021

Deadzone: Bits and Bobs

 I've had some Deadzone bits waiting to be painted up for a while so I thought I'd take a little break from League of Infamy and work on them instead.

It's a bit of a mixed bag so along with a vehicle I have some stuff for the Plague & Veer-myn and a Dreadball character I liked the look of.


First up for the Plague is Dr Gayle Simmonds who is a specialist. She may not look much but her 3+ save and Tough special rule mean she will take a lot to kill. Her ranged attack isn't that potent but she can try to Pin with her rifle so she should be able to support the melee troops in a Plague force by knocking over enemy models. Her last ability is heal which allows her to keep models in the fight and makes them (and her) harder to kill with Resilience (1). She looks like a good all-round support model for any force.


The Rat Swarm's can either be purchased or come free with the Piper unique Veer-myn unit. They benefit from being fast and tough with size 2 making them hard to kill in one go. 


The last model is of Flurple who is part of a set of figures for Dreadball, the Mantic sci-fi sports game based on American football. He/it doesn't have any stats for Deadzone but I liked the model so bought it to paint up. I'm sure I will be able to think up some way to add Flurple in as an NPC into a game.


Deadzone doesn't include rules for vehicles but I have an idea for an escort mission including one so I bought the GCPS Mule to use. I've painted it up in the green & purple of my Marauders who are known to have fought both along-side and against the GCPS in the past. The model is a little fiddly to put together with the wheel supports being a bit of a faff, especially as no instructions are included. 


The last thing I made up are a couple of Zombie spawn points for use with the AI Zombie rules I wrote about the other week. These went together very quickly with some body parts from my bits store stuck into some Polyfilla on an MDF base.


Saturday, 10 July 2021

League of Infamy: Halflings Completed

I have managed to work my way through the last of the Halflings for the League of Infamy which means the 4 bosses and the mighty Iron Beast are done.


The Halflings tend towards the comedy end of the spectrum so we have a range of archetypes on display. Greedyguts is obviously a Halfling that likes an extra serving or two and as such is literally more rounded than the others. 
The Feastmaster comes with two cleavers and a mean look in his eyes. He also has a useful ability which allows for two extra defenders to be activated, this could lead to the villians being overwhelmed under Halfling bodies.


The Master Burglar is one of the extra defenders that stats are provided for but not models. I went with a Reaper Bones model for her. She has an interesting ability which allows her to take equipment from the villains and even use it, which could be nasty for anyone holding onto a health potion for the right moment.


Lastly we have the Sauceror who practises Gastromancy, the ancient art of cooking magic. It's quite an interesting model which again shows a more comedy aesthetic but it's been nicely put together and works well for the food loving Halflings.


The Iron Beast came already assembled which made painting a bit of a fiddley job. It is a good size model though and will no doubt be released as a stand-alone figure for the upcoming Halfling release for Kings of War.


Stats wise it's a bit of a beast in not only name, having a good armour, lots of health and some nasty looking attacks. Any villains running up against this will need to be careful.


So with the Halflings now completed I have only the Trident Realm models and the Villains themselves to paint up for the whole game to be completed.


I had hoped to be starting on some Armada models with Dwarfs and Northern Alliance (for Kingdoms of Men) being the factions I was planning to buy. It seem the Northern Alliance are not being released before next year so I'm going to switch over to the Napoleonic's instead which I have also been planning.


Saturday, 3 July 2021

Deadzone: AI Zombies

 The game of Deadzone is set within the eponymous 'Deadzones' of the Galactic Co-Prosperity Sphere (GCPS), the rule book describes as Deadzone in this manner:

A Deadzone is a place where ordinary rules do not apply. Any intruder, human or otherwise, found on such a planet will be automatically treated as hostile by the Enforcers, who are licensed to use terminal force in all such cases. Between the incidents that render them Deadzones, and the aggressive presence of the Council’s elite forces, these planets represent some of the most dangerous places in the galaxy, but also some of the most lucrative. 

There are several reasons that a Containment Protocol could be enacted on a planet one of which is a Plague outbreak. The Plague spreads across species and infects everything it comes into contact with (except for Marauders who seem immune) and rapidly over-runs a planet. Again in the rulebook we can read:

First encountered in the so-called ‘Death Arc’, an area in the Fifth Sphere of the GCPS, the Plague is one of the greatest threats to all sentient life in the galaxy. Whether the Plague is natural in origin or was, in fact, engineered by some ancient alien civilisation is just one of the many questions surrounding this horrific disease. Its link to artefacts of alien origin is established, though their purpose and provenance remains mysterious. It was thanks to the Plague that the Council established both its own authority over the GCPS as well as the Containment Protocols, as they desperately tried to manage the first encountered infestations of Plague.

So when playing Deadzone on a Plague infected planet it would be nice to have some of the Plague victims to be involved in the game to at least give a hint of what it would be like to fight in a Plague ridden zone. 


Deadzone does already include some rules for how Zombie types can be used in a game but this requires them to be activated each time a player activates a model, which effectively doubles the number of things you need to do for each activation, this can only slow the game down. What I wanted was a way to add the Zombies in but not overly slow down the game play.
My idea is that the AI troops will activate after both players have completed their turn so the normal flow of the game is allowed to continue and then players can resolve the AI at the end. The Zombies are meant to add a little flavour to the game rather than be the focus of the game.


So the principles that control the AI are these:

1) After both players have completed all activations for a turn, activate one squares worth of models at a time, players take it in turns to activate squares until all are done, in any order they like. The player that completed all their activations first gets first choice.

2) Must move/charge towards closest model as defined by behaviour flow, but controlling player decides on the move in cases of more than one valid move.

3) All models in a square move/charge at the same time, so can get the outnumbering bonus together.

4) AI models always attack if able, never defend.

5) When rolling for melee the player controlling the AI troops always rolls for them, even if attacking their own models.

In order to simulate the different types of Plague victims I've come up with 3 behaviour flows which can be assigned to various models. All of these are melee only, again this is to help speed the resolution of the AI phase but also to help keep this a flavourful addition to the game.


The first flow is for those mobs which like to be grouped up and attack as a horde, so the 3Z Zombie is a good example of these. I think these would want to be setup/spawn in groups of 3 on the board. They essentially are happy to engage in melee if they have a friend but would prefer not to if alone.

Horders

1) If in square with another Horder and within 1 of enemy, charge

2) If in square with another Horder move 1 towards closest enemy

3) If alone move 1 toward another Horder within 2

4) Move 1 towards closest enemy


Next up are the solo fighters, so from my collection that would be the Mazon Labs Plague Victim. As the name suggests they would be deployed a single models and they just want to get stuck in ASAP.


Solo Fighters

1) If within 2 of enemy, charge

2) Move 2 towards closest enemy


The last type is the Big Baddy, the Aberration is a perfect example. These want to be the biggest fiercest model on the table so they prioritise the larger models to fight first.


Big Baddy

1) If within 1 of size 3+, charge

2) If within 1 of enemy, charge

3) Move 1 towards closest size 3+

4) Move 1 towards closest enemy


I've not had a chance to play the AI rules yet so I need to work out a few points, like how many of each type do you want on the table at once and how do they get introduced?
My initial feeling is that you could probably have 2-3 groups of Horders and then one Solo Fighter or Big Baddy at a time in a smaller points game 150/175 without it impacting too much, though it could be you just want the Big Baddy on it's own at that points level. Introducing the models onto the table could be done via set spawn points and then a dice roll to see if you get a spawn event or perhaps via the Items counters, if you are feeling nasty.
Another question is should you get Victory Points for killing the AI ? I lean towards a yes on that one, if the majority are going to be the 3Z Zombies which are worth no VP's then it shouldn't unbalance things overly.


So this should be a good starting point to test from and see if the rules work to add some flavour and fun to the game and don't break the flow which makes Deadzone so special.


Sunday, 20 June 2021

League of Infamy: Halflings

 This week I've been continuing with the League of Infamy miniatures and have been making some progress on the No Half Measures expansion. This pits the villains against the Halfling defenders who have some surprises up their sleeves. 


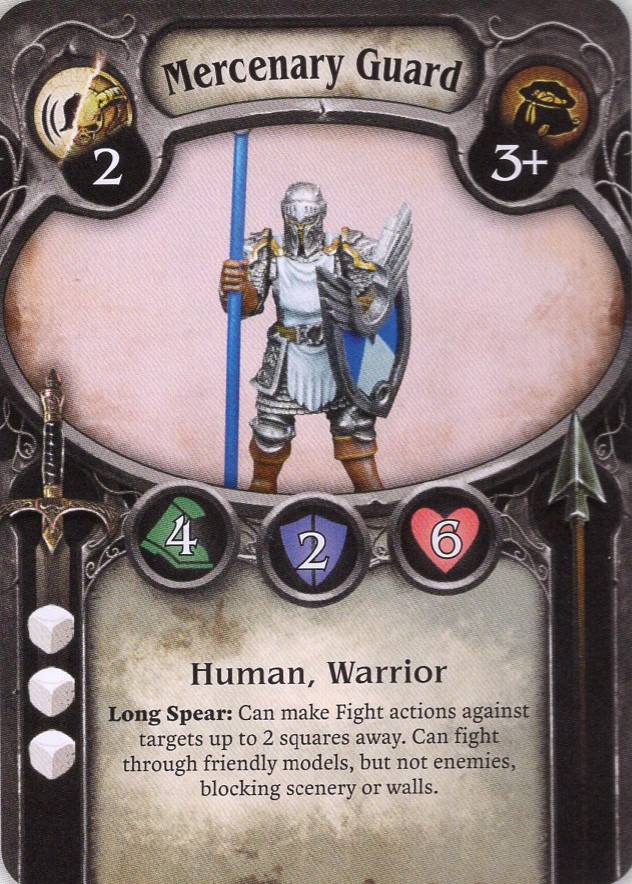
You get five different defender troop types and then a few heroes, who I have just started work on. The defenders each have a cost (top left corner) and the keep master can spend alarm tokens to recruit the models of their choice. 


On the card you can see the main stats across the middle:
Boot - speed
Shield - defence
Heart - life

Attacks are worked out by rolling the appropriate number and type of attack dice and then this number minus the targets defence (unless any special abilities come into play) is the amount of damage done.


The number and type of dice to be rolled is displayed on the left & right side of the card with the number of spots on the sides of the dice changing as the dice increase in power.

Left side - melee
Right side - ranged

White, 1 * blank, 4 * one, 1 * two
Orange, 2 * one, 2 * two, 2 * three
Purple, 1 * two, 2 * three, 3 * four


As well as the defenders that came with the game I've also painted up some Wargames Atlantic Halflings which could be used with the extra stats that came with the game for units they didn't provide models for. The sprue didn't have the option for crossbows but they should work fine I'm sure.


So that's all the basic troops done for the expansion with just the bosses to go, they shouldn't take too long to complete apart from the Iron Beast which is a big ole model so may be a few weeks in the paint shop.


Sunday, 13 June 2021

SAGA: Graeculi

 Over the last few weeks I've been playing as Syracusan Greeks against Mr T's Romans. These offer a different playstyle to the Carthaginians and rely mostly upon infantry in the open making use of Phalanx abilities. Units in uneven terrain cannot make use of Phalanx so you need to be careful with the terrain deployment otherwise you severely limit the power of the battle board.


Being able to activate multiple units for one dice is always good in SAGA so Implacable Advance is nice for the Greeks, as it gives you the option to move or charge. The caveat of this moves/charges all being in open terrain does slightly limit it's uses but as you want to stay in the open anyway it's not a massive disadvantage. 


The board does give the Greek general multiple ways of building a good defence in melee and Hammer & Anvil allows you to build on a solid defence. It is best used to absorb an enemy attack when they hopefully burn all their dice and then charge a fresh unit into that fatigued by the combat.


If you are lucky enough for an enemy to charge a unit near your Hearthguard block then you can unleash your main hammer unit when the enemy is least prepared to take a charge.


The board also offers ways to keep your levy skirmishers in the game when they may look like easy pickings. I didn't initially have any javelinmen painted up for the Greeks but in order to use these abilities I ordered some Victrix models and quickly painted them up.
Thureos is a nice little surprise for your opponent as they will need to re-roll all those lovely high scores, as you start with an armour of 4 for the levy javelinmen then this should save you a good few wounds.


If you manage to combine it with Aspis then you should have a really hardy block of infantry. Extra defence dice is always nice but being able to save on a 4 by closing ranks should make them into a decent anvil. You can't combine this with Hammer & Anvil as the levy cannot gain Phalanx but it is good for holding up a flank.


The Greeks don't have any abilities which allow you to cancel enemy activations but they do get one which allows you to give a unit Resilience (1) and also Wall of Pikes. This ability encourages you to keep your Warrior and Hearthguard infantry close together in order to cancel the maximum possible number of wounds. You should enjoy the look of disgust in your enemies eyes when they manage to sneak some wounds past your defences only to have them cancelled out. Combining this with Hammer & Anvil is a good move.


The Greeks do lack a few things from the battle board, most obvious is a way to cancel enemy activations and also shooting reaction for anyone who isn't infantry armed with javelins. You want to get into combat with the enemy and after absorbing the best they can give hit them back in their turn. You do get another ability (Hubris) which allows you to charge a unit which was a defender in a melee after the melee is over. That gives you up to 2 charges in the enemy turn, again these are best made once your opponent has burnt their dice. They also lack any ability to remove fatigue so you need to be careful not to let is build up too much.


Saturday, 5 June 2021

League of Infamy: Elf Defenders & More

Rather than focus on this week's SAGA game I thought I'd post up the defenders I've been working on for League of Infamy. 


The first campaign is set around an Elf Drakon farming facility so you get lots of Elfs, Drakons, and some nice kitty cats.


As well as the base miniatures the game comes with some stats for models not included so you can add your own. The rear ranks are models I've added in to represent Palace Guards and Kin Archers, these are from my spares pile.


I also purchased an Elf mage from Reaper to give models for all three of the extra profiles provided.
This is quite a varied set of models so for the Elfs I went with a green & grey theme and then for the Drakons I mixed it up with a range of different colours to add some variety.


I also painted up my fourth Lord on Drakon, which I found a bit hard going after completing the three for my Kingdoms of Men. He came out OK in the end, but it was somewhat of a slog.


The Kickstarter version game also comes with some extra scenarios and rules for wandering monsters with figures included for these.


Whilst I was grappling with the Lord on Drakon I started on these as well to keep my painting mojo going.


The Brocks (giant badgers) and Owlbears are my favourites out of the set though the nasty looking Cave Dweller (giant mole thing) is also a good model. 


This means I have a decent chunk of the defenders completed with the Halflings and Trident Realm forces to complete, and then the villians.